Figures from ceiling tiles. New Year's stars from ceiling tiles! Video: How to make an airplane from ceiling tiles
Nowadays there are a huge number building materials, the remains of which we most often throw away. After the renovation, there are a lot of pieces and scraps left that can be used for all sorts of souvenirs and to make useful things for the house.
Most people have a creative streak, and especially if you have children, there are an endless number of interesting crafts you can make with them.
Foam plastic as a material for crafts
Remains of foam ceiling tiles are an excellent material for creativity.. It is easy to cut with a knife or scissors, durable, tolerates coloring very well, and glues perfectly. Therefore, just like from simple polystyrene foam, crafts from ceiling tiles can be made with your own hands easily and simply (see).
Of course, from household foam, which is usually used to cover household appliances, you can make more voluminous things (see). Because it is thick. In those cases, you can even cut out a ball or an egg using a sharp blade. Flatter tiles provide no less opportunities for creativity. Let's remember our childhood together, and just figure out what can be made from the remains of ordinary ceiling tiles.
DIY crafts from foam tiles
The simplest type of craft that can be made from ceiling tiles is pendants or Christmas tree decorations.
New Year decorations

You will have fun and useful time with your children if you start making this kind of jewelry.
- Using a stationery knife or just scissors, the figures are cut out according to the outline previously drawn on the tile. These could be hearts, bells, flowers, stars or snowflakes.
- Do not immediately take on too complex drawings; to begin with, these can be simplified forms. If the children are small, help them by cutting out the main figures yourself.
- Now, using PVA glue, you can stick on any designs made from colored paper, glitter, rhinestones or beads. You can draw pictures on the blanks.
Pay attention! Keep in mind that the paint should not contain acetone or other active substances, as the foam will melt from them. It is best to use gouache, tempera, felt-tip pens or artistic oil paints. However, it is worth noting that oil paints take quite a long time to dry. Pencils will not work, as they will only press the material, but not draw.
Festive, especially New Year's decorations - pendants are made to your taste, then a loop is glued to each one. For example, simplified figures of Santa Claus and Snow Maiden, snowflakes, etc. They are then painted and, after drying, hung on the Christmas tree or made into a garland.
Another thing you can make from ceiling tiles is a three-dimensional Christmas tree for the New Year.
- To do this, take about 10 pieces of foam plastic (more is possible), and draw a circle on each one. Moreover, the first circle is the largest, and all subsequent ones are smaller than each previous one. And so on - until the smallest. The largest will be the bottom, and the smallest will be the top.
- Now on each circle, teeth are cut along the contour. These will be the branches with the needles of the future Christmas tree.
- Next, we take a fairly stiff wire, one end of which we insert into a pre-prepared piece - a stand, bending the tip from below.
- Mugs with teeth need to be painted green and, after drying, we string them onto a wire frame (the future trunk of the Christmas tree). We start from the bottom, that is, from the largest circle. And so on in order, to the very top.
The Christmas tree is ready. All that remains is to decorate it according to your taste and desire.
Cards and valentines

Greeting cards or valentines are another type of DIY craft.
- Valentine cards are cut out in the shape of hearts, then painted to your liking.
- The sparkles applied to them will look very original. This is done very simply. The finished heart after the paint has dried in the right places smeared with transparent glue. PVA or office glue is best. Then, until it dries, these places are sprinkled with small glitter. Manicure glitters, which are sold in haberdashery stores, are very suitable for this purpose.
It is better to make postcards in the form of a book. To do this, two identical halves of polystyrene foam are cut off, then fastened along one edge with a glued paper strip. The card can now be opened and closed.
Educational toys

Letters and numbers are useful crafts for your child’s development that you can make with him from ceiling tiles. You can cut out the whole alphabet, which, by the way, will be perfect for a child if he is learning to read and count. You can cut out letters to convey a greeting, such as happy birthday to a family member, and hang the phrase on the wall. This will be a pleasant and original surprise.
More complex crafts- volumetric pyramids, houses, cars, etc.
Individual parts are cut out (walls, roof), then glued together into a finished product. For the car, they cut out body parts and wheels, then glue everything together in the same way.
Pay attention! Thick PVA glue is best suited for such purposes, since the paint may lie unevenly on office glue after it dries.
This way you can build an entire city. To do this, take a large thick sheet of cardboard, then glue each fence, house, car and other parts to it.
Cutting crafts

Cut-out crafts made from foam leftovers look very original.
As we understand, this is only a small part of the ideas that can be implemented even by those who are not strong in creative activity (see). In fact, there are a lot of options for crafts made from ceiling tiles that anyone can make. The main thing is desire and imagination. Then you will spend time usefully for yourself and your loved ones.
MK turned out to be very long and detailed. Why was such a material used as ceiling tiles? It shows very good veining and the star looks very impressive! And such a star is made very, very quickly.
0:391 0:401For one ceiling tile you need a little less than 1.5 m of film and a pack of pins. Quantity 50-60 pcs. The cost of such a star is from 1 to 1.6 rubles.
0:636


Take a holographic self-adhesive film
3:1178
We apply a star and mark the ends of the rays with dots.
4:1788 4:97
For clarity, I connected the points with lines. We cut out the resulting polygon, remove the protective paper and glue our workpiece.
5:858

The next stage is pasting the rays. To do this, cut the self-adhesive as in the photo (make sure it reaches the very corner)
7:2105
We begin to fold the film. If the rays are thin enough, the film will be wider than the ray.
8:683Immediately cut off the excess
8:728
But this is only on one side of the ray. On the other side, we do not cut the film, we carefully glue it with a bend. back side the connection is not visible, but it will hold on so tightly that you can even hang it out in the cold.
9:1621

So all the rays were sealed. If you need a double-sided star, then we do exactly the same pasting on the other side, with the same bend.
11:1251
12:9
Reverse side.
12:58

Here our star is ready. But that's not all...
14:1370
Draw little stars. It is possible with a different number of rays and different sizes.
15:2031
This is how you can fit up to 60 stars of different sizes, close together, on one tile.
16:666

Now let's embellish our star. Let's cut out a smaller star from a contrasting color from holographic film and glue it on. If you do this option, then the veins should be drawn at the very end, when all the layers are glued.
18:454

And for fastening, we insert an ordinary tailor's pin into the end of the beam. We just try to stick it in the very middle so that it doesn’t come out somewhere on the side and accidentally scratch us.
20:1800
This way you can fasten them together in 2-3 pieces. If you want to make a whole garland, then you need to glue the pins. Another option is to glue 2 stars of different sizes together. Then you need to cover the stars with self-adhesive on one side. This is the most effective option.
21:1008
And finally, another scattering....
22:1581
DO. DECORATE. GIVE IT TO YOUR FRIENDS!
23:574 23:607 23:631The nuances of creating crafts from ceiling tiles. Templates, stencils and photos of products.
The person is talented at making inventions in handicrafts. The greater the scope of creative materials, the more amazing the results.
After renovations, we often end up with pieces of ceiling tiles that we mercilessly throw away. Meanwhile, it makes beautiful flowers, snowmen, airplanes, and houses.
In addition, children willingly get involved in the creative process, helping to glue together the parts of a future craft and paint it.
Let's talk in more detail about the nuances of working with ceiling tiles and creating a number of decorations from them for the winter holidays.
Snowflakes from ceiling tiles: templates for cutting, photo

To make snowflakes from this material, take cheap ceiling tiles with a smooth side.
Using a stencil, transfer the contours onto it and cut it out.
After painting the snowflake on both sides and drying it completely, attach the finished result where you planned. For example, in a children's room, around the Christmas tree, in kindergarten.
Let's add a number of interesting snowflake templates for printing.


And photos of the finished products:


DIY Christmas tree made from ceiling tiles: diagrams, descriptions, stencils, photos

To make a Christmas tree from ceiling tiles, you will need either:
- a clear example, for example, a picture
- flight of fancy
Note that needlewomen perform such crafts in different ways:
- with volume
- as a separate flat fragment with additional decoration with decorative items
- sticker on cardboard
As an example, we will analyze 2 options for making a Christmas tree from ceiling tiles.
Volume:
- take 7-10 sheets of tiles
- draw a circle on each one so that each next one is larger in diameter
- cut them out and stack them from largest to smallest
- create a jagged edge on each using scissors
- pass the wire through the central points of the workpieces
- secure its end from below by twisting it
- straighten the rings
- paint each one green
- add tinsel, shiny decorations
2D Christmas tree:
- Place a stencil on a sheet of ceiling tiles and trace its outline
- carefully cut with a knife or scissors
- cover acrylic paint on both sides
- after drying, repeat the previous step
- add decorations from beads, sequins, paper
- make a loop from strong thread/yarn and secure it to the top edge of the tree
More stencils for cutting out a Christmas tree from ceiling tiles:


And a number of finished products:


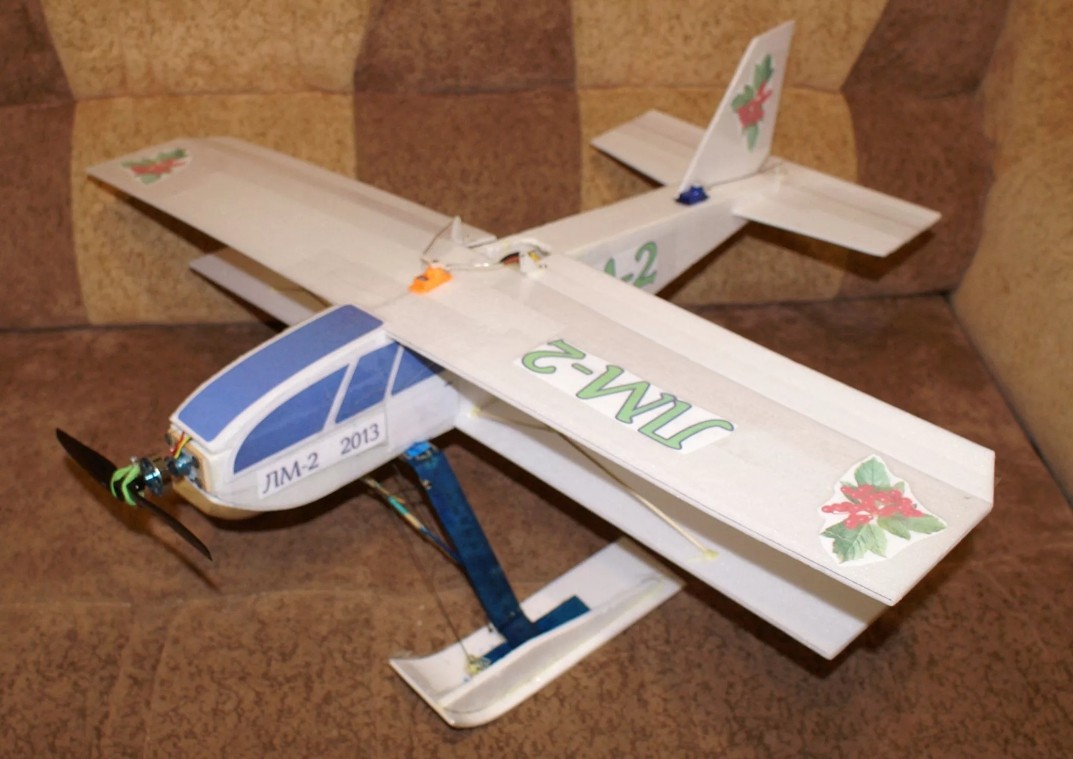
Airplane ceiling tiles

Approach the creation of an aircraft from such material with all seriousness.
First prepare your materials:
- sheets of ceiling tiles without pattern
- printed detailed drawing airplane
- markers and pencils
- stationery knife and ruler
- PVA glue
- emery sheet
- a piece of thin foam
- pins and plasticine
To make your plane a copy of a real model, follow these steps:
- print and cut out the airplane drawing
- stick it on the ceiling tile
- carefully, retreating 1-2 mm, cut out the parts of the future aircraft with a stationery knife
- sand the edges with sandpaper
- glue the parts together like this - air intakes, body, fins, fuselage
If you plan to launch your plane into the air, then after the glue has completely dried, go to an open area for experiments.
Santa Claus's house made of ceiling tiles

This craft is interesting to make for both children and adults, and together. Thanks to the ease of working with ceiling tiles while cutting out individual elements, you can create your own unique house.
List necessary materials similar to those discussed in the sections above.
And the procedure is as follows:
- mark the walls of the house and the floor in the shape of squares/rectangles
- to reduce the number of parts to be glued, make 2 walls as pentagons
- cut out the parts with a stationery/construction knife
- draw windows and doors, as well as patterns on the walls as desired
- go over the markings with the knife again
- glue along the joints of the wall
- using a template, prepare tiles for the house, cut them out and glue them together
- secure the roof between the triangular gables
- add a chimney pipe on the roof
- If desired, consider the interior furnishings of the house, for example, furniture, a large bag of gifts
Christmas decorations made from ceiling tiles

The New Year theme in decorative items involves a lot of sparkles, tinsel, and bright colors. Therefore, in addition to the usual kit for creating fakes from ceiling tiles, also take:
- loose glitter or in hairspray/decor
- watercolor or other brighter paints
- glitter packing tapes
- tinsel
- find templates for interesting decorations, for example, in the form of cartoon characters, animals, snowflakes, Christmas trees
- transfer them to the tile and cut them out
- paint in the desired color and leave to dry
- make a hole in the top of the ornament and thread it through
- form a loop or a beautiful bow out of it
- add glitter from a balloon, tinsel around the edges and hang the finished decorations where you planned
Ceiling tile flowers

Depending on the creative idea with the location of their placement, flowers from ceiling tiles are:
- big and small
- flat and voluminous
- with thread fastening or fixed with glue
The technique for making such crafts is identical to any of those discussed above, namely:
- paper template
- projecting it onto the ceiling tiles
- cutting
- painting with acrylic or gouache
- joining parts with any glue, except “Moment” and superglue
- decorating and cutting holes for threads/ribbons
If you wish, add life to these flowers by drawing their eyes and smiling mouth with your children.
DIY Christmas tree decorations made from ceiling tiles

This homemade green beauty will delight children and guests even more if you decorate it with ceiling tile toys.
They are lightweight and easy to make. The only criterion for creating them is your imagination and the variety of available means for decoration.
We can safely classify such toys as:
- animals of the winter forest and the coming year
- New Year themed cartoon characters
- bells and candles
- snowflakes
- stars
- ballerinas and princesses
- chimes
- rockets
If you are planning a themed New Year's party, then make those decorations that are suitable for your specific occasion.
DIY snowman made from ceiling tiles

What winter holiday would be complete without a snowman craft? It's time to make it and enliven the space of your home/office/kindergarten.
Entrust the children with creating small snowmen that can easily become decorations for the Christmas tree or as pendants for a chandelier/doorway.
Try to implement more complex ideas yourself, for example, a snowman with open arms from which snowflakes/balls strung on threads go down.
To make a similar snowman, cut out the following from the ceiling tiles:
- head
- hat
- mittens
- torso passing into arms
- many small circles or snowflakes
Connect all the parts of the snowman with double-sided tape.
Make holes for the threads, onto which you carefully string the finished balls and snowflakes.
Use more glitter paper, tinsel and sparkles.
DIY Santa Claus from ceiling tiles

The main expected hero of the New Year holidays is Santa Claus. This is probably why children and adults enjoy making his figures from scrap materials.
Such a fertile material as ceiling tiles is an excellent basis for both the classic figure of a bearded grandfather and an openwork, creative one.
Another point is that in the latter case, the craftsman’s skill with a knife and a high-quality template that will be securely fastened during the cutting process are required.
Be sure to add paints with acrylic or gouache. And also sparkles and smiles on the face of Santa Claus.
Ceiling tile tank

To make the tank a toy that your child will enjoy spending time with, make it voluminous and controllable.
To do this:
- mount the motor on a piece of plywood,
- cut out the frame of the track compartment and glue it,
- pay attention to the creation of large drive wheels and tracks,
- then go to the loophole. Make it in the form of a hollow box or by laying out a stack of blanks from the ceiling tiles,
- add color to the tank by highlighting the wheels, body, tracks,
- Draw icons and markings of the finished product as desired.
So, we looked at the features of creating crafts from ceiling tiles, methods of attaching them to different surfaces, and decoration techniques.
Take a stationery knife and a square of tiles and create, for example, the simplest shapes to decorate the space of your home.
Inspiration and joy of creativity to you!
Video: house made of ceiling tiles
Who didn’t enjoy making paper crafts as a child, especially if your parents were with you?
They cut out snowflakes, folded cockerels and boats - a special chic. Back then they didn’t know that this creativity was called origami. It would seem that everything is clear in the name: ceiling tiles - put them on top. But no!
Composition of tiles suitable for crafts
Who, after renovation, did not collect the remains of tiles, baseboards, their pieces and trimmings, glue? And it’s a pity to throw it away - what if it comes in handy, but suddenly it may never come. Perhaps our instructions will allow you to take a fresh look at the used material, and your children will enjoy communication and joint creativity with you on New Year's Eve.
For clarity, we offer several photos showing handmade crafts:
It is necessary that children's crafts hang on the Christmas tree in the most visible place, because the main thing is not the price of the toys, but the importance of joint production.
- cuts well with a knife or scissors, paints and glues well;
- Household packaging foam allows you to produce voluminous crafts and various gizmos;
- Combine tiles of different thicknesses in your crafts.
Making various crafts
Let's start with simple crafts, as in mathematics - from simple to complex.

Christmas tree pendants
Coming New Year, preparing Christmas tree pendants or toys:
- Trace the outline of a heart, bell, tulip, star or snowflake with a pencil, and use a paper knife or just scissors to cut out your outline sketches;
- They should be fairly simple. Consider attaching crafts. As an option, loops of thread will be glued to the toy with glue, or holes will be made in the crafts and threads will be pulled through them;
- Help young children cut out pictures. Do not make complex figures, so as not to discourage either yourself or your children;
- , from which the blanks are prepared, let it lie in wait;
- From simple colored paper, various candy foils, sparkles, rhinestones, beads, we will prepare a whole heap of decorations for our drawings;
- We attach and decorate tile crafts with PVA glue: cutouts from colored paper, sparkles, rhinestones, beads;
- You can sit and paint everything. It is preferable to use gouache, tempera, felt-tip pens or artistic oil paints. If you have time to dry them, oil paints take a long time to dry;
- Pencils, even the softest ones, do not draw, but press through the material of the blanks; it is not advisable to paint with them;
- For the Christmas tree, of course, it is better to prepare figures of Father Frost, Snow Maiden and snowflakes. They are distributed either one at a time in different places, or garlands are prepared from them.
Attention: To avoid melting of the foam, the paint composition should not contain acetone or other active substances.
Volumetric Christmas tree

Volumetric herringbone made of ceiling tiles – original idea and it’s very easy to prepare:
- You only need 10 pieces or more of foam, and a circle is drawn on each. The principle of the nesting doll is from a large circle to a small one. A large circle is the base, a small circle is the top, and inside there is a pyramid made of circles of different circumferences;
- On each contour of the circle we cut teeth, imitating branches with needles;
- A fairly stiff wire or a thin metal rod is taken onto the tree rod, a baked electrode can be used, and one end is inserted into the stand;
- The mugs are painted in green and strung onto the rod from below.
Valentines
Have you tried making your own Valentine's Day cards and surprising your loved ones? Everything starts for the first time - so let's try to experiment.

- The Valentine card is cut out in the shape of hearts, painted as desired, backed with paper, glitter, foil, decorated, and smeared with transparent glue. Manicure glitter is poured onto these artistic spots of glue, ribbons and butterflies are glued;
- You can make a postcard in the form of a book. Two identical square or rectangular polystyrene foam plates go on it; the edges are fastened with a paper strip glued to both halves;
- Letters and numbers for teaching reading and counting to small children are cut out from ceiling tiles;
- Various parts to collect educational toys and build entire cities with cars, trees, flowers;
- Various details are glued onto a large sheet of cardboard, and a picture of the city, a swamp with reeds and frogs is created, Vasnetsov’s paintings are recreated, and warning signs about danger on the roads are made.

Three-dimensional paintings

Cut-out paintings made from the remains of foam tiles can be compared to wood carving - and this is aerobatics. A sharp stationery knife is used to remove all excess and leave a drawing previously applied with a felt-tip pen to the tile, or pressed from paper with a sharp pencil;
The reverse side is either covered with colored paper and the drawing is hung on the wall on a loop, or a stand or leg is prepared for it.
Attention: The walls of schools, gymnasiums, and lyceums are decorated with such crafts.
House layouts
From the leftovers you can make houses of various sizes and complexity with your own hands. All parts of the house are made separately: walls, roof, doors, windows and much more.
- They cut out interior items, furniture and household appliances from tiles.
- Using scraps of fabric, imitation curtains, upholstery and other home textiles are made.
- All parts are painted and glued together with transparent glue. The process is quite labor-intensive, but very exciting.
You can create copies of architectural monuments or simply beautiful buildings. The cost of the raw materials is quite low, but the result is impressive.
Flying models
Many exemplary dads, who not only love to launch airplanes themselves, but also prepare flying models with their children and enjoy their flights, make crafts from foam plastic.
They are more reliable than a paper kite, and watching their flight is much more interesting. A glider made from ceiling tiles turns out to be very light, maneuverable, well controlled, floats on the air flow and flies for a long time.
To make it you need to prepare:
- Ordinary tiles without a relief pattern;
- PVA glue;
- 4x4 slats made of pine;
- Buttons, clothespins;
- Pins or needles;
- Templates, pens, markers;
- Stationery knife, fine sandpaper on a block, plasticine.

Responsible work requires a scientific approach. It is necessary to make a drawing and make airframe templates:
- A printout of the drawing is pasted onto the cardboard, the template is applied to the tile, with buttons you need to attach and trace the wing, stabilizer and keel;
- Remove the templates, then use a medical scalpel or a stationery knife, allowing 1-2 mm, to cut out the blanks;
Attention: Do not touch the workpiece lines, remember the allowances.
- We begin processing the workpieces, having previously marked the boundary lines;
- A profile is given to the stabilizers and the wing using a sanding block, back and forth translational movements;
- Try not to spoil the part; process with smooth movements. The profile can be given with a heated iron, but this requires skills;
- Got the details the desired shape? Start gluing with PVA glue.
Attention: Do not use glue The moment that will turn the plane into amorphous substance, similar to porridge.
- A rail of 18-25 centimeters on both sides is smeared with glue and placed for 5 minutes to saturate the wood;
- The stabilizer and wing are coated with midline glue, fastening is done with clothespins, the keel is attached to the wing with pins along the same center line;
- After 5-8 hours, the structure dries, settles, and you can begin setting up the model;
- The glider is launched from the hand, and its flight properties are visually determined;
Tip: Your glider rises sharply - place a piece of plasticine on the nose. It dives - sculpt plasticine onto the tail or bend the stabilizer a little, which will balance the structure.
Now you know what else, besides cladding, ceiling tiles are good for. Of course, this is only a small part of what can be invented and manufactured. Try inviting your children to come up with their own crafts, and you will be surprised by their imaginations and desires.
You can make unique decorations and crafts for the New Year from ordinary foam ceiling tiles. The article contains examples of these and a description of how to do them.
Often there is a desire to decorate your home with holiday crafts. This ritual is especially important on the eve of the New Year. After all, it is for this celebration that people expect some kind of miracle. Children expect magic first, so they try the hardest.
Crafts can be made from various materials, and there is a lot of information about this online. Very original Christmas tree toys are made from ordinary foam tiles, which are glued to the ceiling. Next, let's look at examples of New Year's decorations made of polystyrene foam in detail.
How to make a white fairy house from ceiling tiles: diagrams, description, photos
To get started, first of all, stock up on free time. This process will require patience, skill, and desire. And the kids will be delighted with this work.
Prepare materials and tools in advance:
- scissors, marker, glue
- tile, sharp knife
- felt-tip pens, gouache, colored paper, foil
The house can be made in one plane, or rather, simply cut out a pattern of the roof, front panel with a window and a pipe on the roof from foam plastic. Or you can build a whole 3-D model of a real fairy-tale gingerbread house or Baba Yaga’s hut.
For the second option do the following:
- Cut out four walls of the house from polystyrene foam
- Two identical roof parts
- Two isosceles triangles for the front and back of the attic part of the building
- Then carefully make openings where the windows and doors will be
- In the future, you can decorate them with colored paper and make curtains inside
- Glue all finished parts of the product
- Cut the pipe and glue it to the roof
- To make the house more fun, you can also make a whole courtyard
- There, make a Christmas tree in the yard (again, from polystyrene foam)
- Use felt-tip pens and paint to decorate it and draw toys on the branches.
How to make snowflakes from ceiling tiles: cutting templates, photos
What would a New Year's holiday be without beautiful white snowflakes of different shapes? They are cut out not only from paper, but also from ceiling tiles. It’s just worth considering that you can’t fold polystyrene foam like paper so that the snowflake turns out strictly symmetrical.
To create neat products you will need patterns (templates that you can make from cardboard). Such patterns are subsequently not difficult to transfer to the material using a regular felt-tip pen; you just need to outline the contours.
You will see a number of such examples of patterns in the image below.


They can be printed on a printer, and then carefully cut out and glued to stronger paper. Again, cut them out, after which you can safely transfer them to the foam tiles.
Now cut out the intricate patterns of snowflakes on the foam with a sharp knife. Hang the finished products on the Christmas tree or decorate them with garlands and chandeliers in the house.

IMPORTANT: When you cut out snowflake figures from ceiling tiles, keep in mind that the material is brittle and perform the process carefully, with maximum accuracy.
How to make a Christmas tree from ceiling tiles?
If the Christmas tree is already in the house, then the children know that gifts will definitely appear under it for the New Year. But there are unexpected situations when adults did not have time to buy the most important symbol of the New Year. In this case, don’t be upset; a nice Christmas tree will turn out from different sizes of ceiling tiles.
True, the product will require thicker tiles. In addition, you need to collect more squares, then the artificial beauty will come out large.
Fold the squares into a pyramid, as in the picture below. Glue a small top on top.
 Christmas tree - do it yourself
 IMPORTANT: Any decoration for the Christmas tree will do. Silver rain, garlands, beads will be very useful.
How to make Christmas tree decorations from ceiling tiles?
As Christmas tree decorations, you can use a variety of figurines with a suitable New Year theme.

 Santa Claus with gifts
  Deer - do it yourself

How to make decorations from ceiling tiles?
From one ceiling tile you can cut dozens of small decorations that hang on front door or to other places on the eve of New Year's celebrations.
Whoever knows how to draw well is without special effort beautifully decorate products using felt-tip pens, gouache and other auxiliary materials. To keep them on the garlands, Christmas tree, stars, bells, snowflakes, tie threads.

 Beautiful decorations for the New Year
 IMPORTANT: Follow safety rules. After all, polystyrene foam melts and easily ignites when exposed to high temperatures, fire. Therefore, it won’t hurt you to explain to your child that you can’t play around with fire to avoid a fire.
How to make flowers from ceiling tiles?
Flowers, like snowflakes, must be cut out after you transfer the design from the template to the foam. To make them different colors, decorate them with gouache. A varied pattern will be created on the surface of the flowers, as there are interesting patterns on the ceiling tiles.


How to make a snowman from ceiling tiles?
Using the appliqué technique, make a snowman from ceiling tiles. Then place it under the tree on a small stand made of another tile so that it does not fall. A cheerful snowman will delight you and your children and charge you with positivity throughout the winter holidays.

 Snowman for New Year's holidays made of ceiling tiles
 How to make Santa Claus from ceiling tiles?
You will get a cute Santa Claus on the Christmas tree in the form of a toy if you cut him out according to a template from ceiling tiles. In addition, for a beautiful design, you can dress him in a hat or a fur coat made of red fabric. And paint your face with paints. Make the beard, mustache, and edges out of white plush. Work progress:
- Cut out the foam pieces
- Start by assembling the bottom of the tank
- Glue all the other parts of the craft together
- Carefully color it with felt-tip pens and paint.


Polystyrene foam is an excellent material for this type of craft. If you have imagination, you can come up with various toys for the New Year yourself. Thus, please yourself and your little family members by making them together.
Video: How to make an airplane from ceiling tiles?