Varieties, marking, installation and fastening of lamp holders. Electric cartridge types, device, connection and repair How to fix a bulb holder from a lamp
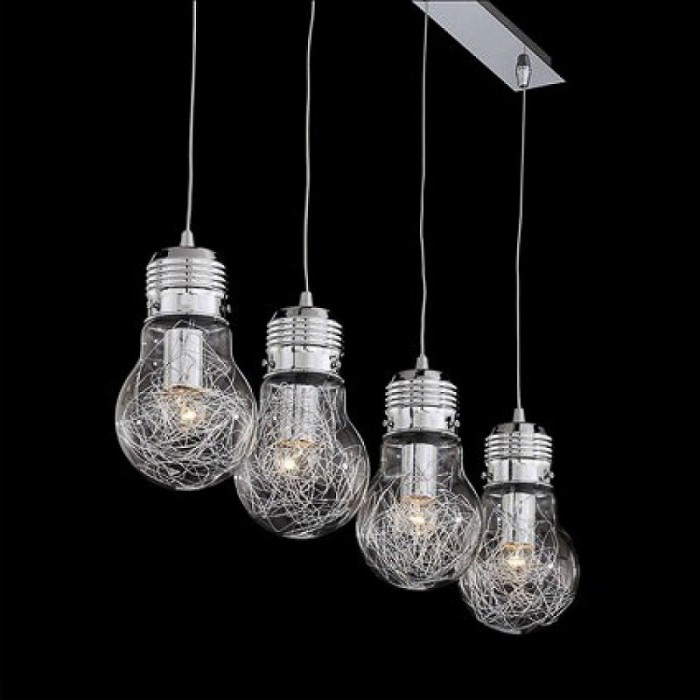
Any chandelier has a cartridge into which the light bulb is directly screwed. In addition to fixing it, a similar element is involved in current transmission, and also performs several more functions. A ceiling or lampshade is attached to it, as well as other possible decorative elements of the lamp.
It happens that you need to replace not only the light bulb, but also the cartridge for the chandelier. It is quite possible to cope with this task on your own. Correct actions will help restore the full functioning of the device. It is necessary to adhere to the work and also perform all actions according to a certain scheme. The advice of professional craftsmen will help you complete all the steps correctly.
Types of cartridges
Considering the technology of how to change a cartridge in a chandelier, it is necessary to study the varieties of these devices for their intended purpose. According to the field of application, there are 3 types of devices presented.
The first type is marked as E14. Such cartridges are designed to illuminate, for example, a microwave oven or a refrigerator. For their small size, they are popularly called minions. The highest current for which they are designed is 2 A (about 440 W).
The second type is the E27 chandelier cartridge. This is the most common type of such products. Maximum current, for which the presented devices are designed, is 4 A (about 880 W). There are also more powerful cartridges. They withstand a current of 16 A (approximately 3.5 kW). They are used for street lighting. Cartridges for this type of searchlight are marked E40. When choosing such products, be sure to take into account their variety.
Cartridge device
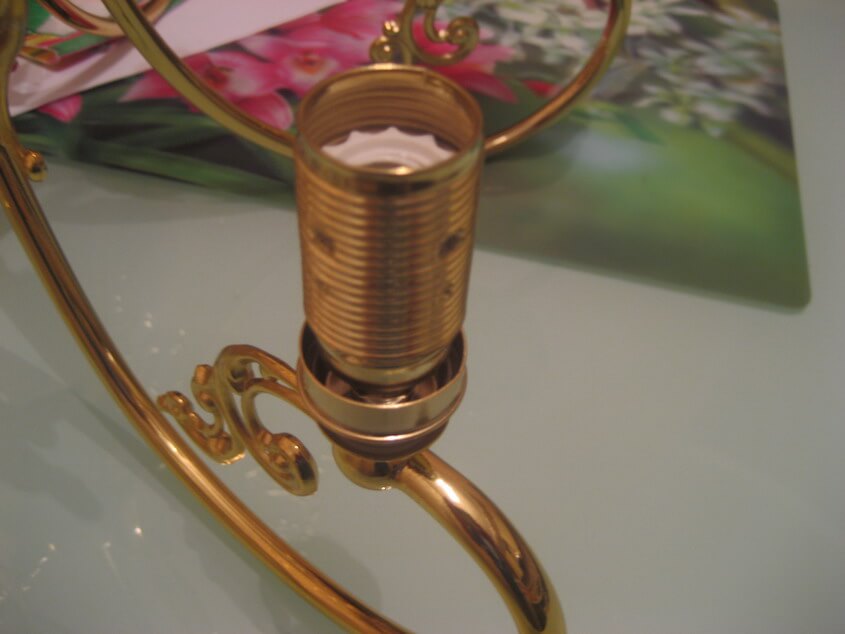
Regardless of whether the E14 or E40 chandelier cartridge is installed, its device will be largely identical. The difference between them is only in dimensions and some structural elements. Each cartridge consists of 3 main parts. The first of these is an Edison threaded sleeve. A light bulb is screwed into it. The cartridge also has a bottom and a ceramic insert. These elements transmit current to the lamp.

To do this, the cartridge has 2 brass contacts on the base. There is also a special threaded bar. A phase falls on the central element of the base. This minimizes the risk of human contact with the conductive elements of the cartridge. This increases the safety of its operation. This is the standard design. Wires are connected to it, due to which the presented device is activated.
Non-standard cartridge
Considering the technology of how to change a cartridge in a chandelier, it is necessary to understand the device of a non-standard type of product. They are much less common. The vast majority of cartridges have the principle presented above. In non-standard varieties, it is somewhat more difficult to understand the device.
Several light bulbs can be screwed into such products at once. If you do not remember how the wires were located, you can not figure out how to connect them. Therefore, when replacing a non-standard cartridge, the wires must be marked. There are places on the bar for connecting wires. They are attached in the correct sequence. Phase and zero must be connected to the appropriate holes. Between them make a special jumper. Without it, subsequent lamps will not light if the first illuminator is not activated.
Assembly of a simple cartridge
To understand how to properly connect a new cartridge, you need to understand the technology of its assembly. The ceramic plate is adjacent to the brass contacts. On its opposite side is a steel plate. It is fixed on the ceramic insert with a screw and nut.

This design not only performs the function of a latch, but also actively participates in the operation of the entire system. A chandelier socket with a nut and a screw conducts current through these elements to the central contact. Grover is not required without fail. But his presence is welcome. Moreover, the screw must be tightened very tightly, because it transmits current to the lamp. The second brass plate is connected in the same way. In this case, the central contact must be bent to the level of the conductors on the sides.
Wire connection
When connecting an E27 chandelier socket with a nut, it is necessary to correctly connect the wires to the contacts. They must be pulled through the bottom. Rings are made on the wires that have been stripped of insulation and screwed to steel plates.

If the system will be controlled by a fixed switch, the phase is connected to the central contact. Before this, it is necessary to check the reliability of its fit. To do this, rest against the side conductors. In this case, the central (phase) contact must bend at least 2 mm. If this does not happen, this element is corrected, raising it a little. Also, the choice of wires must be given sufficient attention. They must correspond to the total electricity consumption of the illuminator.
Considering how to replace a cartridge in a chandelier, it should be noted that for a simple device, the process is completed at this stage. The case in the form of a cylinder is wound on the place allotted for it. All wires and connections are hidden by this decorative element. The cartridge is ready for screwing in the lamp.

Professional electricians are advised to purchase cartridges in which the wires are connected using terminals. This is an easier and safer way to operate the instrument. In such a product, a special cassette is installed instead of a screw and a nut. It has terminals to which wires can be connected very quickly. Experienced electricians claim that such devices have a longer service life.
Connecting a chuck with a clamp
The chandelier holder with terminals has one minor drawback. This species cannot be repaired. If you need to replace it, you will need to purchase the entire cartridge in order to resume the operation of the lamp. But all the work will take a minimum of time.

The case of clips and cartridge is made of plastic. This is a monolithic structure. Conductors are connected to the system through special clamps. They are simply tightened with a screwdriver. Their design makes it easy to replace a collapsible cartridge. Similar products of type E14 and E27 are on sale. Therefore, they are mainly used only for indoor installation. It will be easier for a novice electrician to mount this type of cartridge.
Screwless device
The most modern development is considered to be a screwless chandelier cartridge. It has special holes for the wire. Usually there are 2 pairs. A special spring mechanism tightly presses the wire that is pulled through them. A paired clamping system allows you to connect lamps from a chandelier with several lighting fixtures in parallel. When using energy-saving lamps, it is quite possible to connect 10 or even more electrical consumers to such a device. Use a flat-bladed screwdriver to pry the clamp out. Next, the wire is inserted into the appropriate connector. After that, the screwdriver releases the brass spring. It will firmly press the wire to the contacts.
A feature of such clamps is the requirement for lead wires. A stranded cable is difficult to bring into the socket intended for it. Therefore, a wire type with a solid conductor is required. Sometimes manufacturers of chandeliers specifically provide for the presence of stranded wire. This allows you to easily bring them into the clamp. This is the simplest type of cartridge. It will be much easier to change it. Its performance is far superior to other varieties. Therefore, it is one of the most preferred varieties today.
Having considered what a chandelier cartridge is, you can independently replace a failed product. Modern types of devices allow you to do this quickly and efficiently.
The light bulb is attached to the lamp and is in contact with electricity using cartridges. It is to the cartridge that the cable for the transmission of electric current is supplied. All design aesthetic components of the chandelier are also attached to it.
The design of the product includes several elements:
- cylindrical outer body;
- sleeve;
- bottom of the cartridge;
- ceramic insert;
- brass contacts;
- fasteners;
The body serves not only to fasten the sleeve. It is also a protection against. Inside it are hidden central contacts.
The sleeve has an internal thread. It is called the Edison thread. A light bulb must be screwed into threaded cartridges. There are also sleeves with spring sockets. In them, the light bulb is simply stuck with the help of special pins. The number of pins may vary.
When the center contacts of the sleeve and the contacts of the base of the light bulb touch, the contact closes. electrical circuit and the lamp lights up when power is applied.
The current is transferred from the conductors using brass contacts.
Cartridges may have various devices for connecting wires:
- Contact clamps for screw connection.
- Contact clamps for connection without screws.
- Tips, which are used for connections.
- Wire leads for connections.
- conclusions to which you can solder wires.
Varieties and features
Structurally, they are divided into 2 types:
Pin

screw

They differ in the way the bulbs are attached. Incandescent lamps most often have a screw base. They need chandeliers with screw cartridges.
Halogen, as well as LED, can be produced with different socles - both screw and pin.
Cartridges are also divided according to the material from which they are made:
- Most often, in their manufacture, heat-resistant plastic is used.
- Occasionally ceramics are found.
 ceramic cartridge
 Features of ceramic products:
- Withstands high heating temperature.
- higher price.
- Sticking of the sleeve to the base from heating at long-term use(as a result, when unscrewing the light bulb, the sleeve unscrews with it).
- On screw products fixing nut sticking high temperatures(to prevent this from happening, the nut must be metal).
Features of thermoplastic products:
- Withstand incandescent lamps no more than 60 watts.
- change color during operation (if they are white).
- Short service life(dries out at high temperatures).
- Low price.
Cartridges differ in overall dimensions. Most often, standard products are used in chandeliers - E27 or minions - E14 and 27 - this is the inner diameter in millimeters. The easiest way to pick up a lamp for them. Suitable not only ordinary lamp incandescent, but also LED.
The design of the elements E14 and E27 is the same. They differ only in diameter. But keep in mind that E14 can only withstand a small amount of power. Therefore, several of them are needed to illuminate the room.
There are also other varieties- E10 and E40 with an inner diameter of 10 and 40 mm, respectively. E14 and E27 are sometimes available with a built-in switch.
G type cartridges are designed for halogen and fluorescent lamps with matching plinths. They have many varieties. The most common are G4, G9, R7S, GU10. Therefore, you need to be very careful in their choice.
For products with a G base, the numbers indicate the distance between the legs.
How to choose a chandelier holder?
- Design must match the product that was in your chandelier. Otherwise, there may be problems with fastening.
- When choosing you need to read the label very carefully.
- Coincide must all parameters - dimensions, power, voltage.
- Ceramic body preferred as it is more durable.
- Products E14 and E27 identical in quality.
- Better to buy products well-known manufacturers.
Marking
 All the necessary parameters must be indicated on each product. Marking includes:
- normalized current (unit of ampere) (sometimes lamp power in watts);
- normalized voltage (unit of measurement volt);
- normalized pulse voltage (unit kilovolt);
- type of current (for cartridges with a switch);
- manufacturer (the corresponding trademark, brand is indicated);
- product type;
- moisture, dust protection;
- highest operating temperature;
Products E14 and E27 can operate at a rated voltage of 250V. E14 withstands a rated current up to 2A (power 440W). E27 - can consume much more - up to 4A (power 880 W.).
Characteristics:
- Normalized temperature marked with the letter T.
- To indicate the magnitude of the current use the letter A (amps).
- Voltage– V (volts).
- Moisture protection has a symbol– IPXI. This symbol is usually printed on the outside of the cartridge.
How to replace the cartridge yourself?

It often happens that a light bulb mount fails at a chandelier. Anyone can cope with the replacement of a faulty element. This process does not require special knowledge in electrics.
Symptoms of a malfunction:
- Presence of rust on contacts or sleeve.
- Hull damage.
- Spike plinth sleeve lamps.
- Short circuit between contacts.
Necessary tools and materials:
- correct product;
- indicator screwdriver;
- insulating tape;
- piece of wire;
- terminal block;
- construction knife;
Important! Before starting work, you must turn off the power! It is dangerous to start work under voltage!
 Work sequence:
- First you need to dismantle the chandelier. It is inconvenient to work on weight. If the chandelier is mounted on a hook, it just needs to be removed. If there are fasteners, they need to be unscrewed.
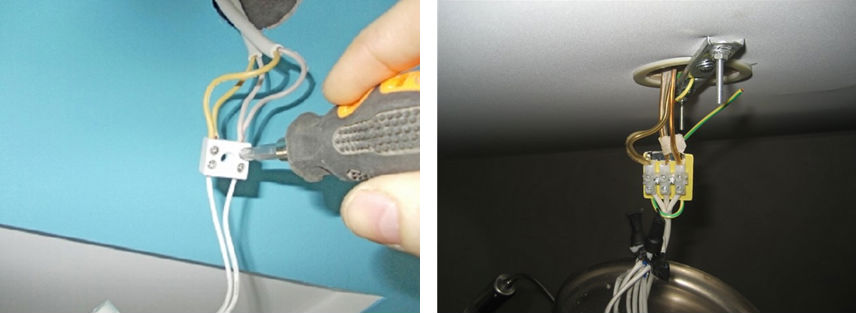
- Then we disconnect the power wires of the chandelier. If there is a terminal block, you need to unscrew the clamping bolts, pull the wires out of it. If the connection is twisted, remove the insulating tape and unwind the wires.
- Place the chandelier on the table to work comfortably.
- First you need to dismantle the old cartridge. They can be attached to the chandelier different ways. In each case, an individual approach is required. To dismantle a faulty element, you need to disassemble it, that is, unscrew the cylindrical part. Then pull out the wires.
- Installation of a new one. In place of the old element, install a new one and fix it.
- chandelier set to its original position.
- Power wire passed through a hole in the chandelier.
- wire ends clean with a knife (remove the insulation).
- Unscrew clamping bolts of the terminals at the ceramic insert. We insert them into place, then clamp them with a screwdriver.
- Insert installed in the inner groove, then fixed.
- chandelier fasten in place.
- screwed light bulb, tested in operation.
If the lamp lights up when power is applied. Everything is done right. Important! The phase conductor should only be connected to the center contact in order to avoid electric shock. Important! Even if there are no problems with cartridges, it is recommended to force them to be changed every 5 years.
Manufacturers and prices

The price of cartridges depends not only on its type, but also on the manufacturer. The price can vary significantly with a well-known brand. The lighting market is represented by products of both domestic and foreign brands.
If one of the bulbs in the ceiling lamp stops burning, and after replacing the lamp, the light does not appear, one of the reasons for the breakdown may be the failure of the cartridge. Most often, contacts in this element burn out or the case itself breaks, which cannot be repaired. Next, we will tell you how to change the cartridge in the chandelier with your own hands, providing instructions in pictures and visual video tutorials.
So, in order to correctly replace the failed element, you must perform the following steps:
- Turn off the light on the dashboard. It is strictly forbidden to carry out replacement under voltage!
- . You can, of course, change the cartridge without removing the lamp, but this will be much more difficult. All that needs to be done is to disconnect the connection of the conductors (usually twisted or, as in the photo) and remove the chandelier from the hook or plank.

- Disassemble the lighting fixture by removing the glass shades and unscrewing all the bulbs (usually e27 or e14 - minion) so that they do not break during the repair process.
- Unscrew the visible part of the electrical cartridge and disconnect the wires. In some models, the contacts are on the base. In this case, you will need to unscrew the clamping screws.


- Dismantle the ceramic base of the product.
- Replace the lamp holder by connecting the phase to the central contact of the base, and zero to the remaining free one. You can identify the wires by color by reading.

- Reassemble the chandelier in reverse order.
You can clearly see how to change the cartridge in this video lesson:
Repair manual
By the way, sometimes there is no need to change the electric cartridge, but simply repair it. For example, in the video below, the master was able to solve the problem without removing the chandelier and without replacing the cartridge:
How to fix the light without disassembling the lamp?
If you have a lighting fixture with halogen lamps We recommend watching this tutorial:
How to change cartridge?
That's all I wanted to tell you about how to change the cartridge in the chandelier with your own hands. We hope that the provided replacement technology with photo and video examples was useful and interesting for you! By the way, this method can be suitable not only for a ceiling lamp, but also for a table lamp if it is broken.
It is hardly worth starting by considering the simplest option - installing a new one of the same type instead of a faulty product. Even a schoolboy is able to cope with this, knowing that you first need to turn off the voltage, and then unwind the cartridge itself, loosen the clamping screws of the terminal block, and so on. Mostly this question interested in those who want to "modernize" the chandelier in order to use it instead of the traditional "Ilyich light bulb" energy saving lamp- for this you often have to replace the chandelier cartridge. Here we will deal with this in more detail.
It is pointless to remind the advantages of various halogen, and others. Once they are chosen, then all their advantages are already known and appreciated. But why change the cartridge in the chandelier? It's all about the discrepancy between the parameters of the socles (diameter and thread). Without delving into the classification of cartridges and the differences between their types (, E40), it is enough to indicate that one of the two must be installed - “14” or “27”. Lampholders E40 are designed for street lamps.
1. Turn off the machine in the apartment (access) panel. Hence the conclusion - it is advisable to replace the cartridge during daylight hours. What if this condition is impossible for some reason? Install near the location of the chandelier table lamp so as not to work in complete darkness.
If the wiring in the apartment is done “wisely”, then the sockets and ceiling lights are wired according to different lines(although the author also encountered “pleasant exceptions”). But we turn off the introductory machine for safety. This means that the sockets will be de-energized.
In an apartment, if an internal shield is mounted, it’s even easier. It is enough to turn off the corresponding machine.
2. Move the wall (or other) switch of the chandelier to the "off" position. If for some reason it is undesirable to turn off the introductory machine.
3. Using a probe-indicator, check the absence of voltage at the terminal block of the chandelier, through which its wires are connected to the intra-apartment line.

Why is this necessary if everything is already de-energized? According to the rules of electric / installation, the switch (circuit breaker) is installed on the phase line, up to lighting device. Now the question is, does everyone know this? And of those who are "in the know", how many observe this provision? It is better not to take risks and check the presence / absence of potential at all terminals of the block.

4. Disconnect the wires of the chandelier. Here you need to navigate how it is more convenient to do it - leave it in limbo or first remove it from the hook ("butterfly").
5. Lower the chandelier down. Replacing cartridges at a height, especially if the lamp is large enough, with several bulbs, is not the best solution.
6. Remove the chuck. First, it unwinds, after which the wires are disconnected from its ceramic block. Next - remove the lower part of the case. Its fastening is made in different ways, depending on the design features of the chandelier. The procedure is easy to determine by visual inspection.

If the chandelier has been in operation for a long time, then you need to pay attention to the condition of the wires inside it (from the cartridge to the block). At this stage, they are easy to replace with new ones.
Next - reassembly and connection. And here is another tip - this must be done immediately. If you leave the installation of a new cartridge "for later", then it is not a fact that such work will go quickly. For those who do this for the first time, difficulties arise, as much is forgotten on the second day. Proven by practice.

If the connection of the chandelier was previously made by twisting, then it is advisable to organize a new connection using terminal blocks.
For domestic use, it is better to purchase WAGO products. Spring-loaded contacts are much more convenient to work with. Learn about the range and specifics of the use of these products.
To restore the chandelier to its full capacity, it is not necessary to replace the lamp socket, which does not glow, even if the filament is not broken. Flask depressurization (another probable malfunction) is the rarest case.
Typical malfunctions
- "Western" tongue. This often happens if, when replacing light bulbs, they are screwed in too hard. Therefore, the central contact of the base does not reach it. It is easy to lift a little, for example, with a thin screwdriver.
- Nagar on the tongue of the cartridge. As a result, communication is broken. You can clean it with fine sandpaper. If it is not at hand, the plaque is easily removed with the tip of a knife.
- Poor contact at the wire attachment point. To make a “broaching” of screws is a matter of seconds.
Practical Tips:
- Before starting work, you need to take care of your own safety. What and where to turn off, how to check that there is no voltage on the wires - indicated above.
- In any case, if you have to deal with the chandelier, you need someone to stand nearby and help, and at the same time, insure.
An electric bulb holder is a device that is a connecting node between a lamp and an incandescent element. In addition, with the help of additional fasteners, a lampshade or shades are hung. Through such a part, current is transmitted through wires. The screwed burnt element is easily changed due to the simplicity of the product body.
Product marking
Depending on the diameter of the threaded part of the assembly, the products have several varieties:

Connecting an electric chuck

To understand how to connect a light bulb socket, you need to have a good understanding of its device. The central contact is made of brass. It is pressed against the ceramic insert. For this, there is a threaded steel plate on the reverse side. A screw is wrapped in it, which passes through ceramics and brass.
The screw is screwed in with good force, because the contact passes through the part electricity. A side brass plate is placed next to it, which is attached according to the same principle.
When connecting wires, rings for fasteners are formed on them. They pass through its central hole in the body and are fixed on steel plates. The phase from the network is fed to the central contact.
After that, a threaded sleeve for a light bulb is screwed on top. Then the selection of the lamp is carried out.
Product fastening
 Typically, the fastening of the cartridge in chandeliers or lamps is carried out at the bottom of the case. It is unacceptable to put a weight load on the wires. For fixing in the chandelier from below there is a hole into which a plastic sleeve is inserted. The wiring runs into it and is fixed with a bolt. A more reliable mount is a metal tube. Wires run through it. The nuts located on it allow the installation of ceiling lamps and chandelier caps.
There are special cartridges for installing ceiling lamps or wall lamps. They are carved on the outside. The clamping of hinged elements is carried out with the help of plastic bushings, which are screwed onto the threaded part of the cartridge.
It should be remembered that it is impossible to install a high-intensity light bulb, because the plastic washers begin to melt.
Reasons for replacing the design
Over time, the product needs to be replaced. The need arises for the following reasons:

Before replacing the cartridge, there are some tips to consider:

Dismantling and installation works
armed necessary tools, you can take on the dismantling of the old structure and the installation of a new product . The step by step instructions are as follows:

Power is supplied to the network, and the device turns on. If the work is done correctly, then the light should light up.

An electric cartridge is a product that is present in any lamp. Over time, the structure fails. The cause may be the presence of rust or a crack in the case. The main thing, notice it in time and work to replace it.