Shed options. Do-it-yourself shed - diagrams, drawings, projects and options for how to build simply, quickly and efficiently (155 photo ideas)
The arrangement of a summer cottage begins with a barn. Owners of a plot of land erect an outbuilding right away so that they have a place to store equipment, garden tools and other everyday little things. Modern materials have significantly simplified the construction of country sheds with their own hands and improved them.
How to build a shed with your own hands, what materials to use? More on this below.
A shed at the dacha: when can’t you do without it?
There are summer residents who build a shed “just in case,” but their plot remains uninhabited. Such situations are rare - usually country houses are used as weekend homes or seasonal housing. In both cases, you can’t do without a shed - garden furniture, lawn mowers, tree pruning tools, swings, decorative figures and other items are stored in it.

A pond or pool on the site must be periodically cleaned of silt, algae, sand, and dirt. Pool cleaning equipment can be conveniently stored in a shed. By the way, it can be built under the same roof as a bathhouse or a recreation area can be arranged near an artificial pond.

Sheds often store chopped wood for a fireplace or stove, hay for horses, animal feed, and fertilizer for plants. Sheds on a summer cottage often replace the owner’s workshop.
Samples of sheds at the dacha: photos
Various materials are used for the construction of country sheds:
- plastic;
- wood-polymer composite;
- brick, foam block or gas block;
- unedged board;
- wooden beam;
- corrugated sheeting
The aesthetic result largely depends on the material chosen by the summer resident.
Plastic shed
Such sheds are sold as a set and can be assembled in a few hours - the diagram is included in the kit. Plastic structures are used to store gardening equipment, tools, and watering hoses. Their advantage is a stylish design that fits perfectly into any landscape design.

There are also disadvantages. Plastic sheds can only be used in the warm season - they are not suitable for late autumn and winter, as the material deforms in the cold.
The second disadvantage is the fragility of the plastic, so you need to use the outbuilding carefully. The high cost cannot be discounted - not every summer resident can afford the purchase.
DPK sheds
WPC is a wood-polymer composite, a lightweight and durable material. It is used for arranging open terraces. Sheds and other auxiliary buildings made of WPC are supplied disassembled and assembled according to the same principle as their plastic counterparts.

Stylish design and practicality are the two main advantages of WPC structures. If a summer resident takes care of ventilation, the barn will serve him for decades. Hanging shelves and tool hooks can be mounted on the interior walls.
Brick buildings
Sheds made of brick, foam or gas block are permanent structures that take decades to build. Their advantages are obvious:
- They are not afraid of snow, rain, wind, frost and summer heat.
- The internal space can be divided into zones.
The area of the barn is limited only by the requests of the owner of the summer cottage.

Construction of a brick facility requires certain physical and financial costs, basic knowledge for the arrangement of the foundation, laying walls and erecting the roof.
Shed made of unedged boards
A wooden structure is a simple and economical solution. To build it, you do not need to pour a capital foundation, let it stand, and then build walls. You can build such a barn in 4-5 days. It does not look as impressive as plastic structures, but the costs are several times lower.

Shed made of corrugated sheets
A minimum of physical costs will be required to build a shed from profile sheets. A frame is erected from a wooden beam or a metal corner, and then sheathed with a profile sheet.

We build a barn at the dacha with our own hands according to the drawings
Today, as an example, we will consider the construction of a frame country shed, built from wooden beams and covered with clapboard boards. A drawing of the shed is shown below.

Foundation
The frame building is light in weight, so a shallow strip foundation is sufficient for its construction. The width of the foundation must be 15 cm greater than the thickness of the wall, and the foundation must be deepened by 40 cm.

When pouring the foundation, formwork is used - it can be removable or permanent. The tape is filled with concrete mortar - after the concrete has dried, waterproofing mastic must be applied to the outer parts of the foundation.
Frame
To build the frame, you need a wooden beam of the following section:
- for main vertical buildings - 50x100 mm or 100x100 mm;
- for connecting elements - 40x40 mm or 60x60 mm.
Below is a drawing of a shed with dimensions of 5000x2000x2000 mm. Vertical posts for the frame are installed at a distance of 1-1.5 meters from each other.

It is better to fasten the frame elements together with metal corners on self-tapping screws - this type of fastening is more reliable than nails. Using metal corners, the frame of the shed is also attached to the base - this is shown in the diagram below.

Before assembling the frame, you need to determine the locations for window and door openings. It is important to remember about the slope of the roof - for this, the front wall of the structure must be 20-30 cm higher than the back one.
After assembling the frame, the timber is treated with special solutions that will protect the wood from ignition, rotting, and swelling.
Roof sheathing
The distance between the sheathing bars depends on the roofing material used. A wooden beam is not suitable for arranging a soft roof - you need solid sheets of plywood.
But flexible tiles are used in the construction of country sheds in isolated cases - more often the roof is equipped with corrugated sheets, slate or metal tiles.

All of the roofing materials listed have wide sheets that are attached directly to the sheathing. The timber is laid perpendicular to the slope at a distance of 50-60 cm.
The profile sheet and metal tiles are attached to the sheathing with self-tapping screws with rubber gaskets, so as not to damage the polymer layer and not spoil the decorative properties of the roofing material.
Frame covering
The frame can be sheathed from the inside and outside or only from the outside, using different materials. It is advisable to open a barn lined with wooden clapboard with a special wood varnish.


Unprocessed, it looks faded. But if you open it with dark varnish, the effect will pleasantly surprise summer residents. Log houses in Norway are often built from unedged boards. In Russia, they are gradually adopting this fashion and using this material to decorate the facades of private houses.

When the frame is ready and sheathed, the roof is installed, you can install window frames and door frames.
Construction of a barn for a summer house on video
Summer residents are confused by the fact that a barn can spoil the impression of the site. There are two ways to solve the problem:
- Set aside a place for the construction of an outbuilding in the depths of the plot behind the house so that it is not visible.
- Improve the barn, turning it into a recreation area, planting it with climbing plants.
To help summer residents - a video on how to build a lean-to shed at your dacha with your own hands:
And for inspiration, here are a few photos with ideas on how to decorate a barn on a summer cottage.


No matter how much space there is in country house, on a personal plot one cannot do without such a necessary outbuilding as a barn.
If you don’t yet have experience in self-building, but the owner knows how to use tools, he can easily build a shed at his dacha with his own hands, following the instructions.

If the barn will be located next to the house, and it is important that it looks aesthetically pleasing, it is better to use the same materials from which the house is built. To reduce the cost of construction, you can decorate the barn with siding - it can be different, and imitates any materials - wood, brick, stone of different textures.
How to make a shed quickly and inexpensively
Guided by step by step instructions How to make a barn yourself, you can build it in the shortest possible time, spending very little money.

One of the simplest, fastest and cheapest options is a frame shed. The frame itself can be made of wood or metal, the outside is sheathed with suitable material, a roof is installed - and the comfortable outbuilding is ready for use.

If the barn is made of wood, then the frame can be made of timber. But it is more convenient, reliable and durable to make a frame from profiled pipes with a rectangular or square cross-section - a profile with a round cross-section is more difficult to join and weld.

There are also ready-made metal frames on sale, which are assembled using self-tapping screws, and at the factory you can order a structure according to your own drawing.

As practice shows, assembly of both metal and wooden sheds usually takes only a few days. The photo shows sheds on frames - what they are like, and how beautifully they can be finished.
What should the foundation be like?
Sheds on frames are lightweight buildings, so the foundation for them is made lightweight. Most often, several posts, screw piles or a concrete block are enough - one or several, depending on the area of the barn.

If the soil on the land plot is complex, the foundation can be a shallow strip foundation made of special monolithic blocks.

A reinforced strip foundation will withstand even brick and building blocks– the building will be reliable and will not crack on soil that is prone to swelling, since the movement of the structure will occur together with the foundation.

The choice of foundation type depends on the soil on the site, the area of the barn, the material from which it is built, as well as the financial capabilities of the owners of the site. But it’s easier, faster and cheaper to build a shed on a frame without a foundation.
Frame lean-to shed without foundation
Frame sheds can be built without a foundation at all. There are two options. In one case, the racks treated against rotting are buried 60-80 cm, concreted, and then the lower frame is attached to them, on which the floor is laid on the joists. It is worth noting that this method is only suitable for building a small area.

On soils that absorb and drain water well, you can also build a shed without a foundation this way: the area for construction is marked out in such a way that the area on which the shed will stand is 0.5 m wider on each side than the area of the building itself .

The turf is removed from the soil and a sand and gravel backfill is made, which must be thoroughly compacted. A strapping beam is laid on the prepared site, and floor joists treated with an antiseptic are attached to it - the joists will be in direct contact with the ground, so treatment with an antiseptic is required.

As soon as the logs for the future floor are laid on the site, the floor itself is made. It can be made of planks, from sheets of moisture-resistant plywood or from oriented strand board (OSB). In this case, the recommended thickness of materials:

- for boards – 20 mm;
- for plywood and OSB – 13-15 mm.
When the site for the building is ready, you can begin building the shed.
Pay attention!


When building a frame shed with pitched roof The roof should be installed correctly - its angle should be such that snow rolls off easily.

Practice shows that the optimal angle of inclination is achieved when the height of one wall is 3 m, and the opposite one is 2.4 m. It is a good idea to cover the roof with ondulin - this roofing material is also called Euro slate.

Ondulin is much more attractive in appearance than slate, it has a wave-like shape, and its color can be different, this allows you to make the roof of the barn beautiful, cheerful, truly country-like.

Having started assembling the frame, first the racks of each wall are mounted into the floor one by one. If not boards are chosen for cladding, but ready-made slabs - made of wood, metal or other material, the cladding can be installed on the frame of each wall in advance, on the ground, and the wall can be fixed to the floor in finished form. As an option, the walls can be sheathed with OSB 9.5 mm thick.

There is an alternative technology - Balloon. With this method, installation is carried out gradually - corner frame racks are immediately attached to the frame or the blocks themselves as the racks are installed in height. A rope is stretched between them at each new height level, along which the next racks are then placed.
Pay attention!


When constructing window and door openings, it should be taken into account that the load on the frame is greater here, so it is necessary to strengthen the frame in those places where the window and door sashes will be attached. For this purpose, the openings are equipped not only with corner posts, but also with reinforced posts.
Erection of the roof
Since the roof of the barn will be single-pitched, the rafter system is simple: rafter boards, the length of which to provide an overhang (as a rule, it is made 30-50 cm) must be greater than the length of the side of the area intended for the roof, are laid on the edge. For example, if the planned area of the shed is 3 m by 3 m, then the length of the rafter board should be 3.840 m.

The boards are nailed diagonally - two nails on both sides, so that the roof can more reliably withstand loads under snow pressure and strong winds; it can be reinforced with metal corners.

It is necessary to install a sheathing on the roof (100*25 mm is suitable). If the roof is planned to be covered with ondulin, then the optimal lathing pitch recommended by the manufacturer of this roofing material should be 40 cm.

The final step is to cover the roof with the selected material - ondulin, slate or others.

Pay attention!

Completing the construction of the shed
After the walls and roof are erected, windows and doors are installed in the prepared openings.

You can make a small porch at the door or just one or several small steps - depending on the height of the threshold of the barn.

The lining of the shed can be painted to match the roof, or, if it is wooden, leave it a natural color, which will look organic in the dacha by oiling it.

And to make the building look aesthetically pleasing and neat, the foundation should be covered with an asbestos sheet.

Such a barn, if the site on which it is being built has already been prepared, can be erected in just a couple of days. Built with your own hands and taking into account individual needs, it will turn out to be very comfortable and beautiful.

Photo of a do-it-yourself shed


When planning the construction of a private house or cottage, it is important to provide for the presence of such an important building as a barn in the project. During the construction of housing, the utility block will serve as a good shelter for equipment, and upon completion of all work it can serve as a storage room or chicken coop, or become a reliable place for storing firewood. Using various building materials and original designs, it is quite possible to install such a structure on a plot of land with your own hands.


Peculiarities
Country life begins not only with the improvement of residential premises, but also personal plot. Therefore, to ensure convenient placement of things and keep the area clean, you will need a garden shed. Before building such a cabin, the summer resident must decide what functions it will perform. If you are planning a barn for a summer cottage, which will only house tools and gardening equipment, then you can erect a simple structure without a foundation with windows and a good roof. In the same case, when the owners want to store hay in it, vegetables and fruits stored for the winter, vehicles and poultry, then a more durable structure will be needed.


Since the barn will be a separate building on the site, it will have to be registered, having previously prepared all the necessary documents.
For the construction of utility blocks, the law provides for special standards, so they cannot be built without obtaining permits from the sanitary and epidemiological services. In addition, it is worth considering that capital structures can shade the beds on neighboring plot, which will lead to conflict situations. To avoid this, you need to comply with the standards for placing the shed, according to which the distance from its borders to the driveway and borders on the street side should be at least 5 m. As for the distances inside the site, outbuildings can be installed from houses at least 3 m, other buildings - from 1 m, and from trees - 4 m.
The law also states that every owner land plot cannot infringe on the rights of neighbors. Therefore, the placement of the shed should be planned in such a way that it does not in any way interfere with other summer residents. It is recommended to install blocks without keeping birds and animals according to household and sanitary standards at a distance of 6 m from adjacent areas. Before registering a shed, you must also obtain permission from the fire department. To do this, representatives of the Ministry of Emergency Situations will go to the site and evaluate the plan and make a conclusion technical specifications object.
Once all the documentation is in order, you can safely begin building and arranging the barn.


Design
Any construction begins with design, and the installation of a utility unit is no exception. As a rule, in dachas, a shed is used not only for storing tools and things, but also serves as a separate room for a shower and toilet. Therefore, depending on the purpose of the barn, the owners need to provide for the installation of windows and doors in the future building. The simplest design is considered to be a design made from boards with assembly, but there are also many options using other building materials. Before drawing up the drawings of the shed, you should decide on its size and location.

It is also important to take into account whether the construction will be permanent or temporary, which will help in the future to avoid all kinds of additions. On medium-sized plots, shed designs of 2x3 m in size and 2.4 m in height are usually chosen.
Plank structures are considered an economical option for construction; they are installed within a week and can be easily dismantled. If you are planning a permanent utility block, then it is best to give preference to brick buildings. They are strong and durable, but their construction is expensive.
In addition, at the design stage it is necessary to resolve the issue of laying the foundation. The lack of a foundation can lead to rapid rotting of the floors, which will reduce the service life of the shed. If, according to the project, a cellar will be placed under the barn, then the foundation must be installed. For this purpose, a drawing of the main and underground structure is drawn up.


Layout
The barn is a simple structure, so it is quite possible to build it with your own hands. In order for the outbuilding to fit harmoniously into the landscape design and serve as a convenient place to place things, Before installing it, you need to properly think through the layout and make drawings, taking into account the following nuances:
- It is best to place the building in the background of the site so that it is not visible from the main entrance to the yard.
- The location of the building is chosen in such a way that it does not restrict access to other buildings.
- To protect the structure from rain and melt water, it should be built on a hill.
- Planning options need to be considered before starting construction work. If the barn is additionally equipped with a summer kitchen, play area or workshop, then it is advisable to make two separate entrances.
- If the utility block will only serve as a place for storing equipment, then it is enough to put a small collapsible shed on the site and cover it with siding or clapboard.
- When planning a structure, you should choose the appropriate type of roof for it. Usually it is made single-pitch or gable.
- The location of the doors and the roof slope should be determined before construction, otherwise precipitation will flow directly above the entrance.


If the area of the plot allows, then you can build a spacious barn, the layout of which would include not only a spacious storage room, but also a shower with a toilet. This will allow you to rationally store tools, gardening equipment and take a shower after working in the beds.


Species
Depending on the design features, the barn can be permanent or temporary. Country houses that are planned to be used on an ongoing basis are usually erected in such a way that they fit beautifully into the general view plot and resembled a residential building. Such mini-houses perfectly decorate landscape design, since the same building materials are used to decorate their walls and roofs as for the main house. A permanent shed must be strong, so it is installed on a foundation. In this regard, for this type of buildings it is important to choose the right location, because after installation it is problematic to move them.


The foundation for a permanent shed is selected taking into account the material of its walls and the type of soil on the site. As a rule, a columnar, shallowly buried, monolithic or strip foundation can serve as a reliable foundation. As for walls, they are considered an excellent option aerated concrete blocks, which are easy to install and light in weight. In addition, many craftsmen use frame technologies, covering the walls with decorated corrugated board, clapboard or siding.


If you are building a budget barn, then concrete blocks are suitable for it.
The roof of permanent structures is usually covered with ondulin. This sheet material is in great demand, as it is characterized by excellent performance properties and is available in various colors. Traditionally, these types of sheds are built with a toilet or shower.
No less popular among summer residents and modular designs, having a collapsible appearance. They are placed mainly in small areas or when the construction of a residential building is not completed and further planning of the territory remains to be done. Temporary sheds are built as quickly as possible from scrap materials. Since the design is simple, you can build it yourself, without the help of specialists.


The dimensions of the block are selected depending on the number of items that are planned to be stored in it. Usually these are small sheds measuring 2x2 or 3x3 m. Their structure is framed, choosing wood as the cladding. This allows for quick disassembly and assembly. As for the interior decoration, the walls are often left unsheathed, since the building is designed for short term operation.


How to choose?
The main components of any summer cottage are a residential building, a garage, a gazebo and, of course, a barn. These structures are necessary for comfortable living outside the city, so they must be included in the project plan of the territory. When the area of the plot allows, then household objects are built separately, but if the place is small, then they are often combined by constructing a barn. In such situations, it combines a storage room, a shower room and a small toilet at the same time; options for extensions with a firewood shed are also possible. Therefore, the layout and design of the shed must be chosen before construction begins.


The utility structure should be placed in such a way that it is located behind the house, next to the border of the site. To hide it from neighbors' views, it is recommended to camouflage it using vertical gardening.
You can also choose the original type of building and install it close to the house. The size and appearance of the barn are chosen not only taking into account the area of the garden area, but also its overall design.
The most simple option For dachas, ready-made outbuildings with a prefabricated type of construction are considered. They are a monoblock structure consisting of a metal frame. The walls of such a barn are sheathed with metal and additionally insulated. Since electrical wiring is carried out inside the room, the structure can be used as a multifunctional unit, including a place to relax, a small storage room, a shower room and a toilet. In addition, some prefabricated models provide a folding canopy that allows you to install a veranda.

Ready-made sheds are considered beneficial for a summer cottage; they are quickly assembled, inexpensive and take up little space. To install a container structure, you do not need to lay a foundation; it is enough to use monoblocks or a columnar base. The only thing you need to consider is that when purchasing such a model, you will have to connect internal communications: electricity and water collectors with hoses.
Installation of prefabricated structures is carried out using a truck crane. Such sheds look attractive in appearance and fit perfectly into any landscape design. In addition, they are also durable and reliable in operation, and thanks to their mobility, utility blocks can either be sold after building a house or moved to another convenient location.


Economical sheds built from slabs are also considered a good option for a summer residence. For their installation, use an unedged board. The frame is placed on a pre-prepared base. Since the structure is light in weight, it does not require a foundation.


To protect the building from moisture, it is placed on wide beams or wooden pallets. As for the size of the barn, it is usually made 2x3 m with a height of 2.5 m; the frame of a budget barn is made of timber, which is sheathed with a slab. The attractiveness of such buildings is given by the pitched roof and planted climbing plants.
If the owners of the dacha want to see more modern version barn, then they need to choose frame structures. They are quick to install, but the main condition for their construction is the production of a durable frame of high-quality timber. The external finishing of such blocks can be done with siding, which can be easily replaced with another material over time. The roof is usually made of a pitched or gable roof and is covered with bitumen shingles. A columnar foundation is well suited for a frame structure.

Of course, choosing a shed for a summer residence is not an easy task, but if you calculate everything in advance and create an individual project, then even the most ordinary-looking outbuilding will become a real decoration of the site. In addition, today there are many design ideas that will turn an ordinary pantry not only into a place to store things, but also an excellent relaxation area.


Materials
When planning the construction of an outbuilding, it is important to consider its location, size and choose building materials. Brick sheds are extremely popular among summer residents. They are durable, practical, and look beautiful.
They also have disadvantages:
- Not everyone can do brickwork, so often you have to use the services of specialists for construction. And this will entail additional costs.
- Expensive cost. In addition to bricks, you also need to purchase gravel, sand and cement for work. In the end, the amount will be quite large.
- The need to organize a construction site. If the garden area is small, this will create certain problems and inconveniences.


Wooden sheds are in no way inferior in their performance characteristics. They are quickly and easily assembled from timber; MDF, boards or OSB are used for their cladding. The main advantage of such buildings is considered to be light weight, low cost and the ability to install them yourself. The only drawback of wooden structures is the need to constantly treat the wood with special protective agents or paint it.


In order for such a structure to look beautiful on the site, it also needs to be regularly restored, and this will require additional costs.
Sometimes cellular concrete is chosen to build a shed. At the same time, it is not recommended to use gas silicate, since it quickly absorbs moisture and, therefore, a structure without high-quality finishing will last a short time. Foam concrete is good for outbuildings; it is easy to install and inexpensive. Ordinary plaster can serve as its final finish. There are practically no downsides to foam blocks.
If you plan to install a lightweight shed, then polycarbonate will be the ideal choice. This material, as a rule, are attached to a support frame made of timber. The frame is usually made from aluminum profiles or plastic pipes. At correct installation The barn is assembled in a few days, all work is carried out without outside help and unnecessary financial costs.


A budget option for a country shed would also be corrugated sheeting, which is used to cover the structure. It has an aesthetic appearance, but in order to extend the life of the structure, you will have to worry about protecting it from moisture. With intense condensation and dampness, the “iron” will rust. In addition, it is not recommended to leave tools and other garden supplies in such a block for the winter.
If the shed is intended for temporary use, then it can be built from scrap materials. In this case, installation is carried out using everything that is at hand: old boards, profiles and slate. After the site planning is completed and the residential building is built, such a utility block is dismantled and a permanent facility is installed.


How to do it?
A country shed is a simple structure, so it is quite possible to build it with your own hands. The most important thing is that everything needs to be done step by step and worry about the availability of tools and materials in advance. IN lately Wooden structures are in great demand among summer residents; they can be easily installed yourself at minimal cost.
Before starting construction, you should make a plan diagram of the structure and purchase the following building materials:
- brick;
- roofing felt;
- shaped boards with a section of 150×50 mm;
- slate;
- logs 25 mm thick;
- staples;
- nails.


If the work is carried out by a novice master, then the following step-by-step guide will help them complete the construction:
- First of all, it is necessary to carefully prepare the area and clear it of debris and plantings. Then, to protect the lower part of the building from moisture, “brick chairs” are built, on which a layer of waterproofing material is necessarily laid and covered with timber on top.
- The next step will be the installation of racks. Their number is determined depending on the size of the barn. When installing racks, a step of 1.5 m is observed. In the corners of the joint, they are secured with nails and the supports are secured with temporary struts.
- Then the top trim is prepared and the corners are fixed “to the floor of the tree.” All strappings and racks are secured with nails no less than 200 mm long. In this case, you need to pay attention to the fact that the ends of the strapping extend from the back and front of the barn by 20-30 cm. A sheathing is installed on the top trim, which is covered with roofing felt and slate on top.
- Next, permanent struts and beams with a cross section of 50×50 mm are installed. They should be placed diagonally on the corner posts. In the place where the doors will be installed, an additional stand is placed and a crossbar is attached to it. The door frame is inserted into the prepared opening, after which boards are nailed to the pillars of the structure. If the boards are even, then they are laid close to each other; unedged boards are best nailed one at a time.
- Walls made of boards are covered on the outside with roofing felt, this will protect them from negative influences external environment. Roofing felt should be nailed in such a way that its upper edges extend beyond the lower ones.
- The final stage of work will be laying floorboards along the bottom trim. They also hang the door itself and attach the lock.


This instruction concerns the construction of a wooden shed for temporary use. If you plan to install a permanent structure, you must first lay a solid foundation, make a frame and cover it with any building material. For utility units that will serve not only as a storage room, you will also need to complete the interior finishing.


Arrangement according to purpose
A garden shed has different functionality, so you can arrange it inside in different ways. The most popular type of finishing for utility blocks is clapboard cladding. It is possible to decorate a shed in this way if it is intended for storing shovels, firewood and other equipment, but when a shower is built into the shed, then wooden walls will not be the best idea. To solve this problem, first a plasterboard partition is erected, which is then lined with inexpensive tiles.
An important issue in arranging a barn will be the installation of all communications, including the installation of lighting. For summer residents who plan to use the building as a workshop, it is necessary to provide it with spacious cabinets and shelves. Often, spacious barns have space for storing vehicles; in this case, to facilitate entry, a concrete ramp should be made near the entrance gate. In addition, the utility block should be provided with a canopy, which will serve as an excellent place for storing firewood.


Design
Recently, most city residents have been trying to spend their free time in their summer cottages. Therefore, the cottage should not only be comfortable for living, but also have an appropriate appearance that emphasizes the beauty of nature. This applies to both a residential building and all adjacent outbuildings. If you decorate your shed in an original way, a dusty and tool-filled storage room can easily turn into an attractive “room.”


It is necessary to create the design of utility blocks by placing them on the site. If the area allows, then it is best to build spacious objects with the same style and decoration as a residential building.
This combination will harmoniously fit into the landscape of the garden area. If the dacha is small, you can install neat structures, decorating their walls with climbing plants. This way they will be invisible and blend in with other plantings in an original way.
The color of the shed's finishing should be selected depending on its size and the prevailing palette on the site. For small cottages, it is best to choose light shades; they will help visually expand the space. In addition, on a white or pastel wall background you can perform decorative painting, thanks to which the building will take on a fabulous look. To get an original barn design, it is advisable to use several types of building materials when finishing it. For example, combinations of wood, brick and metal look unusual.


Beautiful examples
- Today, there are many projects for building a shed, but interesting design options that allow you to turn an ordinary pantry into something original are very popular among summer residents. Regardless of the size and design of the structure, it must be improved with the help of climbing plants or a pot with flowers. Thus, a small barn with a shed and a woodshed will turn into a beautiful mini-greenhouse.
- Recently, most dacha owners prefer to replace ordinary barns with large buildings, complemented by windows and doors. Thanks to this, you get a spacious and bright room where you can not only store gardening tools, but also relax comfortably. In this case, it is recommended to install windows from plastic, and cover the walls with colored corrugated sheeting. A good solution would be a small office shed or library shed, in which electrical outlets, a fresh interior and smart design will allow you to enjoy coffee and read books in the morning.
No matter the size of the house, you can’t do without a shed on the site. Not everything can and should be brought into the house, even if there is space, and even if there is not, then even more so - outbuildings are necessary. By the way, this may be your first experience in independent construction: you can build a shed with your own hands without any skills. The main thing is that the hands grow from the right place.

What materials are they built from?
If the shed is located close to the house and you care about its appearance, it makes sense to use the same material as when building the house. If you don’t want to spend a large amount on outbuildings, you can choose the finish so that you can’t tell it from a distance. In most cases, this is not very difficult: there are many technologies and many materials very accurately reproduce the appearance of expensive finishing materials. A striking example of this is. It is available for logs, beams, bricks, stones with different textures. So you don’t have to use expensive materials to build a shed. It is more practical to use inexpensive construction technology, and then cover it with material with a texture similar to the finishing of the main building.
How to quickly and cheaply build a shed
The fastest and at the same time inexpensive option building a barn - by . The frame can be wooden or, it is sheathed on the outside with finishing, a roof is installed and that’s it, the barn is ready. If the barn is planned to be made of wood, it is assembled from timber and boards. A metal shed can be more conveniently made from a profiled pipe: it has a square section and is much easier to weld and join. There is also a special metal frame. It is assembled using self-tapping screws, and the entire structure is ordered and manufactured at the factory. Such houses are considered the cheapest; barns are unlikely to be expensive. Assembling both a metal and wooden shed takes several days: it has been tested more than once.

The frame building is lightweight, so the foundation for the barn needs a lightweight one. In most cases, columns and concrete blocks are sufficient; sometimes screw piles are installed or bored piles are made. On more difficult soils and for those who love reliability, you can build a monolithic or prefabricated () shallow strip foundation.
Another option. It is suitable for soils from which water drains well, and the groundwater is located deep. Then they mark out an area that is 50 cm larger than the planned barn in each direction, remove the turf and make a sand and gravel backfill. Framing beams are laid on compacted crushed stone and floor joists are attached to them (treated with anti-septic tiles for direct contact of wood with the ground). That's it. No difficulties.

This is far from the best option: even with a low groundwater level and careful processing of the wood, the shed will not last long. If you are comfortable with this, you can do it this way.
Foundation for a frame shed
All types of pile or columnar foundations require the placement of single supports around the perimeter: always at the corners of the building and at the junction of lintels (partitions), if any are provided. The installation step of the supports depends on the size of the barn and what kind of logs you plan to use. The larger the span, the larger the section required for the logs.
For example, for a barn width of 2 meters, you can put only two rows of posts and logs and the logs will be 150 * 50 mm (in as a last resort 150*40 mm). If the width of the barn is 3 meters, then either intermediate supports(columns, piles), or take a 150*70 mm board. Calculate what will be cheaper in your region and choose.

With a board width of 100 mm, the floor bends noticeably under your feet. So you have to make the installation step of the log about 30 cm. Then there is no deflection at all, or it is insignificant (depending on the weight).
The fastest way to make a foundation is on ready-made blocks: you can buy them or make them yourself. Under them, pits are dug a little larger in size than blocks. Sand is poured onto the bottom, compacted, then gravel, this is also compacted. The thickness of the compacted bedding is 20-30 cm. Blocks are installed on it, and the lower trim is mounted on the blocks.

If we are talking about a shallow strip foundation, then a trench is dug 40-60 cm deep relative to the ground level, the width of the strip is about 25 cm, and the trench itself must be wider by at least half a meter or more: the bottom is leveled and compacted. Crushed stone is poured onto the bottom and compacted again.

A frame is knitted from a 12-14 mm rod. Four ribbed longitudinal rods are connected using frames made of smooth rod 6-8 mm. The dimensions of the frames must be such that all reinforcement is located at a distance of at least 5 cm from the edges of the tape. For example, if the foundation is 40*25 cm, then the rods are tied into a structure with a rectangular section of 30*15 cm.

A connected frame is installed in the formwork, which is then poured at least M-200
Do-it-yourself wooden frame shed: step by step with photos
A frame barn measuring 6*3 meters was built. The roof is pitched, covered with ondulin. The height of the front wall is 3 meters, the back one is 2.4 m. Operation has shown that with such a difference in height, snow does not accumulate much (Len. region).
Standard FBS 600*300*200 blocks were used as the foundation for the barn. They are laid on a sand and gravel bedding 25 cm thick. A cut-off waterproofing layer is laid on top of the blocks - a layer of roofing felt, on bitumen mastic. A layer of “hydrotex” is also glued on top of the same mastic. This cake was made because the groundwater level was high, and it was necessary to ensure that the building was protected from dampness.

Start of construction of the barn. Waterproofing is laid on the foundation, a frame is placed on it, and a beam is attached to the frame
A beam with a cross section of 150*150 mm was laid on the waterproofing (all lumber was processed). Connected into half a tree, nailed - 100 * 4 mm. For those unfamiliar with carpentry, you can connect the beams end-to-end, nail reinforced corners to the joints from the inside, and a mounting plate from the outside.
In this version, the frame was not attached to the blocks in any way. In regions with high wind loads this is unjustified. You can fasten it using studs: a hole of the same diameter (12-14 mm) is drilled under them, through the beam, into the block. A pin is driven into it, the bolt is then tightened with a wrench. To hide the cap, you can drill a hole for it.
The next step is to attach the floor joists. Installed on the edge of a 150*60 mm board. They are attached to the harness with special brackets of the appropriate size. Attached to 100*4 mm nails.

The logs were aligned along the upper edge of the strapping beam. Everything must be level, otherwise the floor will be difficult to lay. You may have to level it with a plane or redo it.
The frame was assembled using the “platform” technology: first the floor was laid, and the walls were mounted on it. The wall frame or part of it is assembled on the floor. In some cases, they are immediately sheathed from the outside if slab material is chosen for the sheathing. And already in this form (with or without casing) they are lifted, placed vertically and secured.
There is a second technology called “balloon”. The frame is mounted along it gradually: the corner posts of the frame are mounted on the frame or even directly on the blocks. They are leveled in all planes. A rope is pulled between them, along which the remaining racks are then placed. They are also nailed one at a time, fastening them together with slopes and temporary cross members.
In this case, the “platform” technology was chosen and 18 mm thick OSB was laid on the logs. In general, the floor can be made of boards, plywood (moisture resistant), OSB, etc. You will need 20 boards, 13-15 mm plywood, but you need moisture resistant (OSB is moisture resistant by default).

Next, the assembly of the walls began. The frame is completely knocked down: the lower frame, the racks, the top frame. In this form, it is installed exactly along the edge of the strapping beam, aligned, reinforced with safety struts, stops, and slopes. It is nailed through the flooring to the trim beam. The nails were 200*4 mm.

To assemble the frame, 100*50 mm boards were used, the distance between the posts was 600 mm, the rafters were installed with the same spacing. The rafter system was assembled from 150*40 mm.
Window and door openings are reinforced - two boards are nailed, which are nailed together in a checkerboard pattern every 20 cm. The load here is greater, so reinforcement is required. There is a gate at one end for loading/unloading large items. Therefore, in this wall (you can see it in the photo) there are only corner posts and reinforced ones - for fastening the sashes.

Since the roof is single-pitched, the rafter system is simple: boards that are selected for the rafters are laid on the edge. Their length is longer, since the roof overhang is necessary. It is usually 30-50 cm on each side. In this option, with a barn width of 3 meters, the length of the rafter legs (taking into account the slope) was 3840 mm.
They were nailed obliquely with nails - two on each side. It can be strengthened by installing corners: this will withstand even significant wind and snow loads.

The external walls were covered with OSB 9.5 mm thick.

The doors were installed and small steps were made.

The finishing touches were to install the wind board. The barn was then clapboarded and painted to match the rest of the buildings on the site. The barn was built with your own hands on a ready-made foundation in two weekends. Cladding and painting were done much later - almost a month later.

The final barn...beautiful
The unattractive foundation is covered with asbestos sheets cut to size. It turned out to be a beautiful barn.
Shed with a gable roof made of metal tiles
This barn was built alone. The construction is also frame: the cheapest way. In this case, the assembly method is “balloon” - gradual alignment of racks. It all starts the same way: first we made columns for the foundation. Only this time they are brick.

As you can see, there are studs built into the corner posts. Holes are drilled in the strapping beam and it is put on studs. They can be done not only in corners, but also on intermediate posts: it will hold on more firmly.
This barn has a small porch, so a cross beam is installed at the required distance. And the wall will support it. Columns were also pre-made for it.

The logs can also be attached with a notch. Then a recess is cut in the strapping beam in the shape of a log. In depth it should not exceed 30% of the thickness of the beam, so the joist is cut so that it is flush with the frame. This method is more labor-intensive.
Next, the frame was assembled: corner posts 100*100 mm, intermediate posts - 50*100 mm, the top frame and rafter system were assembled from the same board. The triangles at the top are reinforced with applied metal plates. Smaller plates were also attached at the junction of the upper frame beam and the racks. They were connected end-to-end without cutting, nailed on top and diagonally with nails. The plates reduced the likelihood of folding under lateral loads.


The frame was covered with OSB sheets - the most convenient size for construction. Subsequently, the walls will be finished with wood siding.

The sheathing, by the way, does not have to be made of plywood or OSB. You can attach the lining or board directly to the racks. But then, when assembling the frame, you need to install slopes: without the rigidity of the slab material, the building will be flimsy. If you don’t set the slopes, you can swing them by hand.

After installing the braces, you can fill the board, lining, block house, imitation timber - the choice is yours.

For those who are concerned about the appearance of the building, here are some ideas on how to make a barn beautiful in video format.
Video about building wooden sheds
The barn turned out to be beautiful, but not cheap. But it is decent in size, strong and in appearance no different from a house - it fits into the composition. Everything is shown/described in detail, there is one violation: the waterproofing under the metal tiles is laid vertically. Even with good gluing of the strips, sooner or later the water will make a path for itself. Otherwise, everything is correct.
In this case, the barn is built with your own hands on what is probably the cheapest foundation: concrete is poured into old tires. The frame stands on these “pillars”. Naturally, they need to be placed on a flat, reliable surface and they themselves must be at the same level. In terms of strength, the base will not be inferior to the best concrete blocks, and may even surpass them. Tires protruding from under the structure can be closed by making a step and subsequently placing flowers on it or using it for other needs. It will be even more practical.
Another video with a step-by-step illustration of the construction of a frame barn made of timber.
Drawings with dimensions
Several drawings to help you navigate the dimensions of the building. If necessary, adjust to your site or needs.

Shed with a pitched roof - drawing with a diagram of the arrangement of racks


Square barn - dimensions

Every private household always has gardening equipment and tools that need to be stored somewhere. Lawnmower or garden sprayer Chemicals have no place in a residential building. Where to put these necessary things so that they are not affected by the environment and do not litter the yard? You can solve this problem by building a small frame shed with a pitched roof.
Advantages and disadvantages of wood frame construction
The construction of a frame outbuilding from wooden blocks has a number of advantages:
- In specialized construction stores you can purchase ready-made parts for assembling the frame structure of a shed.
- It is not difficult to build such a structure yourself, since the parts are assembled according to the principle of a designer. To do this, it is not necessary to have special knowledge in construction. All elements and connections of the frame are adjusted to size, and the presence of instructions will make the construction process easier.
- A frame wooden shed will last for many years, if it is properly cared for and all rules were followed during its construction.
- The construction of the structure will not take much time. Usually one week is enough to build the entire shed. This time includes: installation of the foundation, assembly of all frame elements, wall cladding, insertion of doors and windows, roofing.
- Wooden parts of the structure are easy to further process.
- When building a shed with a pitched roof, there is no need to install a rafter system.
- The frame structure of a shed can be easily dismantled and rebuilt in another location. In this case, we are talking about light buildings, without a foundation.
- The cost of purchasing materials for such a structure is much less than, for example, a brick one. Many are of the opinion that wooden structures are short-lived and unreliable. However, if you take into account the service life of these parts and the money spent on materials, then this option is much more profitable.
The disadvantages of this design are as follows:
- Wooden elements are flammable material.
- Frame parts may be subject to rotting and damage by wood-boring insects. To prevent this from happening, all wooden elements must be additionally treated with antiseptic pastes, organic solutions or oily antiseptics.
- Wood, depending on its moisture content, tends to dry out, swell, warp and crack over time.
Preparation for construction: drawings of the future barn, dimensions
Before starting the construction of a frame barn, it is necessary to take into account some points of its construction:
- A barn, no matter how carefully it is built, remains an outbuilding that does not particularly fit into the architecture of a residential building. Accordingly, it is better to build this building in the backyard.
- Entry must be free. This will become especially convenient when it is necessary to carry large items or furniture into it, in case of renovations in the house.
- It is better to place the shed on a hill (supports, piles, blocks). The distance between the base of the structure and the ground will prevent: from rotting of its wooden parts, the appearance of moisture in the room and damage to metal equipment by corrosion.
- It is necessary to carefully design the barn so that in the future there is no need to make extensions to it. It will be convenient to divide it into two rooms: in one you can set up a workshop, and in the second - the barn or chicken coop itself.
Two rooms of the barn will allow you to use them for different purposes
- The ground at the site of the future construction needs to be leveled.
- It is necessary to determine what materials will be used to cover the walls and floors. What will it be made of? interior decoration and what kind of roofing to use.
The length, width and height of the future shed are selected individually, depending on the location. For such purposes, medium-sized buildings are most suitable (see image).
Option of a frame barn with typical parameters
Another option for a frame shed
Selection of materials and calculations
High-quality planning for the purchase of all necessary materials will eliminate unforeseen waste in the future.
When constructing a shed frame, the following materials are needed:
- For the lower and upper trim you need: six bars 6 m long with a section of 100x100 mm and eight bars 3 m long with a section of 100x100 mm.
When purchasing timber and boards, you should pay attention to ensure that their moisture content does not exceed 22%.
- For flooring, boards with a cross-section of 40x150 mm are required, in an amount of (minimum) 20 pieces. OSB sheets are used as the finished floor.
- For vertical supports, beams with a cross-section of 100x100 mm are needed, in the amount of 12 pieces, each of which is 2.5 m long. Two such beams will be used as a doorway.
Wooden surfaces must be free of knots, cracks, mold and damage from wood-boring insects.
- There are two ways to slope the roof: in the first case, you need from 4 to 6 bars 50 cm long with a section of 100x100 cm, in the second case, the supports on which the slope will be placed must initially be shorter in length.
- For the sheathing you will need a board with a cross section of 22x100 mm, in the amount of 16–18 pieces.
- For a rough ceiling, you can use multilayer plywood, chipboard, fiberboard or OSB sheets.
- To fasten the beams at the corners using the “paw” method, nails are required, and “into the floor of the tree” - metal corners and strips.
The nails are selected to be longer than the thickness of the board so that they pierce it and enter the next one. This connection will be much stronger.
- When working, you will also need self-tapping screws, screws, and L-shaped metal plates to secure the timber in the corners.
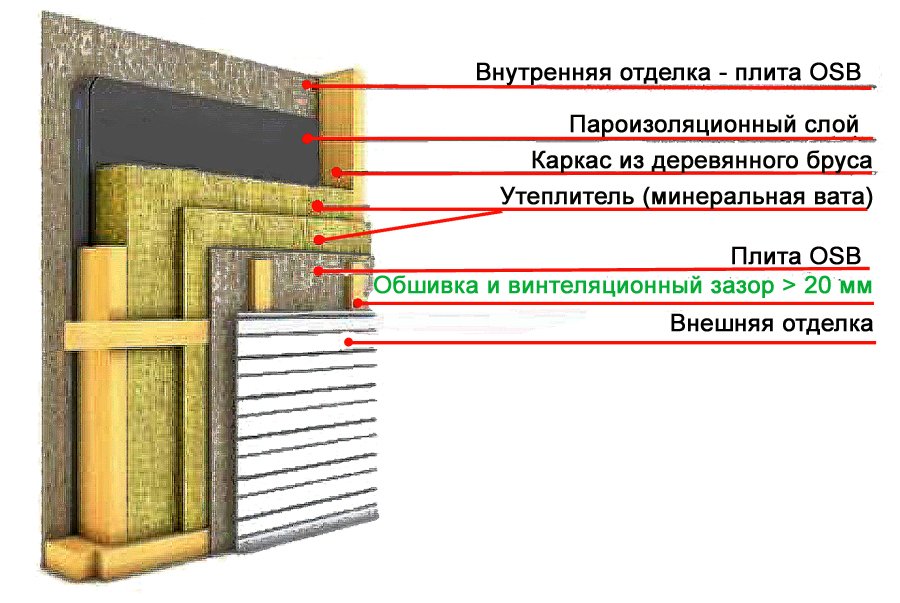
- In the case of insulating the frame of a shed, you may need a thermal insulation layer (foam plastic, mineral wool or penoplex), waterproofing (foamed polyethylene foil), vapor barrier (bitumen), roofing material, polyurethane foam.
Required Tools
To build a frame shed you will need the following tools:
- Shovel (to dig holes for a columnar foundation, it is better to use a screw shovel).
- Measuring tape.
- Marking cord with coated thread.
- Graphite marking pencil.
- Construction level (it is more convenient to use from 50 to 200 cm).
- Square and ruler.
- Stationery knife (for cutting insulation).
- Laser level (using this tool, a perfectly flat plane is determined).
- Chisel.
- Electric drill.
- Circular saw (with its help it is convenient to cut boards of various lengths and sizes).
- Cordless screwdriver (for attaching plywood, boards and OSB sheets to ceilings, walls and floors).
- Electric planer (necessary when calibrating boards).
- Screwdriver.
- All-metal carpenter's hammer.
- Sledgehammer (used when adjusting boards).
- Hand clamps (for clamping boards in different places).
- Wood saw (for cutting grooves).
- Construction stapler (for fastening waterproofing and vapor barrier to a wooden frame).
- Carpenter's axe.
- Construction plumb.
- Nails. For a frame shed you need from 2 thousand to 4 thousand nails. In this case, three types are used:
- GOST 4028–63 Black and zinc construction nails. Zinc ones are used for external work with wooden parts, and black ones are used for installing internal materials.
- GOST 4029–63 Zinc nails for fixing roofing felt and other sheet materials.
- DIN 1152 Galvanized nails for fastening tongue-and-groove boards, face panels and finishing surfaces.
Step-by-step instructions for building a frame shed with a pitched roof
When all the calculations have been made, the construction project is ready and the necessary materials have been purchased, you can proceed to the construction of a frame shed.
Foundation. Which one is better and how to do it
The basis for the frame is the foundation. For frame sheds and utility blocks, a strip, wooden or columnar foundation is most often used.
To protect the wooden frame of the shed from moisture, you can install a strip foundation. For this, a concrete base 40–50 cm high is made. It is important to know that this type of foundation is not suitable for sedimentary and peat soil. In these cases, screw piles are used.
For strip foundation it is necessary to dig a trench around the perimeter, 30–40 cm deep and 40 cm wide. The bottom of the trench is filled with sand and compacted. The result should be a sand cushion 10 cm thick. A waterproofing layer must be laid on the sand cushion, which will prevent liquid concrete from being absorbed into the sand.
After this, a wooden or metal formwork structure is made. It should rise above the ground and be equal to the height of the base. To ensure the strength of the formwork structure, it is fixed with spacers and clamps, and its upper part can be strengthened with supports. Reinforcement 10–12 mm thick is laid on the waterproofing layer, which is tied with wire.
Formwork panels fix the cement substance before hardening
When the reinforcement frame is ready, it is filled with concrete grade M200–250.
Concrete pouring should be done for the entire perimeter at once. To avoid cracks when concrete hardens, it is not recommended to pour it in rainy weather or extreme heat,
Concrete hardens for about two weeks and by this time gains about 70% strength.
Shallow strip foundation suitable for small buildings
When constructing a wooden foundation, larch logs are used, about 300 mm thick, which are treated at least 2-3 times with bitumen.
Holes are dug in the ground 150 cm deep and 30–40 cm in diameter. Sand 10 cm thick is poured into the bottom of the hole and compacted. Each log from its base is covered with a waterproofing layer of 140–145 cm. The resulting wooden pile is placed in the ground. The gaps between the waterproofing and the wall of the hole are covered with earth. To more thoroughly compact the soil around the pile, it is watered and compacted. For reliability, you can fill the hole with concrete.
The use of wooden piles can be an alternative solution for installing a foundation
Most often, a columnar foundation is used when constructing a frame barn. To do this, you need to mark it on the ground using a cord. Along the perimeter of the marking and in each corner, you should dig holes 30–40 cm deep.
Using a stretched cord, markings will be more accurate
It is better to dig a hole 70 cm or more deep, as this is below the freezing point. Sand is poured onto the bottom to form a layer of 10–15 cm, which must be compacted. For reliability, you can pour a layer of gravel 10 cm thick. After this, lay a brick, fastening it with cement mortar. For a shed, a masonry of two bricks per layer is used. If the structure is larger, the columnar foundation is made of three or more bricks.
The most commonly used type of foundation when building a frame barn
The brickwork must be treated with a bitumen waterproofing layer.
To ensure a level surface, all posts must be checked for level.
The space between the brickwork and the ground must be filled with sand or filled with a cement-sand mixture. An alternative columnar foundation made of brickwork are hollow concrete blocks measuring 400x200x200. The voids in the blocks are filled with cement mortar.
Video: installing the foundation
Frame of the structure
Now you can start creating the frame of the shed. For each brick pillar It is necessary to lay two layers of roofing material to protect the lower part of the wooden frame from moisture.
After this, they begin to install the lower trim. For this you need a beam with a section size of 100x100 mm. Beams and logs are assembled from 50x100 mm timber. The distance between them should not exceed 60 cm.
Beams and logs are connected with nails using the “wood floor” method
Vertical posts made of 100x100 mm timber are fixed to L-shaped metal joints or regular nails that need to be driven in obliquely. The distance between beams should be no more than 1.5 m. To ensure stability of the structure, the beams are temporarily reinforced diagonally with 40x100 mm boards.
Vertical and top beams are fixed with L-shaped connections
The construction of a frame barn is carried out not only with the help of wooden beams. Its production from a metal profile pipe is widely used.
The ease of assembly of this design attracts builders
This material option for the building frame has a number of advantages:
- The profile base is assembled without dirt or construction debris in the yard.
- Installation and dismantling of such a building will not take much time.
- If necessary, a metal profile shed can be easily moved.
- For this design, a foundation is not required. It is enough to pour gravel onto a flat area.
- Reinforcement that strengthens the frame will help to withstand the weight of snow and resist strong wind gusts.
- Thanks to a variety of colors, a shed made of profile pipes has an aesthetic appearance.
- The design with a metal frame is very practical, as it does not require treating its parts and elements with antiseptic agents. It is enough to paint it once.
If the building is subject to increased load pressure in the future, the frame is built from stronger pipes. In this case, pipes with a wall thickness of 8 mm and a cross-section of 100x100 mm are used for the lower trim and racks. For additional spacers, a profile with a section of 60x60 mm is used.
Particular attention should be paid when laying profile joists under the subfloor. The distance between them should not be more than 60 cm. The logs are secured to the lower frame by welding.
After this, they proceed to the installation of the interfloor ceiling, which is a frame structure made from a profile, as well as beams. The ceiling lining is attached to these elements from below.
The final stage of constructing a structure from a profile pipe is the assembly of the rafter system. This structural element can be either integral or a separate part of the entire structure. The main load-bearing part of the roof is a powerful channel to which the remaining elements are attached.
After all welding work is completed, finishing begins.
Construction of floors and walls (knots and jibs)
When building a foundation, you first need to make a subfloor. To do this, wooden logs are covered with OSB boards or plywood sheets with a thickness of 12 to 15 mm. Then the entire surface is covered with a waterproofing layer, on which the finishing floor is installed. It is convenient to use tongue and groove boards as this floor covering. They have grooves and ridges on the edges that are ideal for butt assembly. They are usually made from softwood. The resin contained in this wood makes it waterproof. Laying floors with tongue and groove boards is similar to installing laminate flooring.
Tight connection of boards is ensured thanks to protrusions and cutouts along the edges
After this, you can move on to installing the shed walls. To ensure that its structure is strong and lasts a long time, temporary and permanent jibs are cut into the frame.
Strengthening the racks with permanent and temporary jibs will provide additional strength in areas of increased weight load
Jibs are mandatory if the walls are not sheathed with plywood or OSB-3. The use of slab sheathing is five times stronger than the jib (if OSB or 12 mm plywood is used). A board with a cross section of 25x100 mm or 50x100 mm is used as jib when a more stable structure is required. The length of such a board should be 30° greater than the height of the wall. Temporary jibs are used until the upper joists are installed. They help fix the specified position of walls and vertical beams.
Before installing them, the corners of the structure are aligned. In this case, it is convenient to use a bubble or laser level. The installation step of temporary jib is from 1.2 to 1.5 m. They will also help correct structural defects if you use them as a lever.
When erecting a frame structure of a barn, it is important to ensure the correct fastening of the jib and connection points:
- The installation angle of the jibs should be 45° (this is the ideal angle that provides maximum structural rigidity). In those places of construction where it is difficult to withstand it, for example, windows and doors, 60° is allowed.
- The use of hollow jibs is permissible only in small structures (sheds, outbuildings).
- They must fit tightly (without cracks or gaps) to the surfaces of the racks and the upper ceiling.
- For the jibs it is necessary to make grooves in the vertical posts, upper and lower trim. The depth of the groove is made depending on the thickness of the jib. In a metal structure, they should go deep inside the profile of the racks.
- The joints of the beams at the corners of the frame are laid in the “wood floor” or “in the paw” method. In the first case, 50x50 mm cuts are made on both sides of the log to half its thickness. In the second case, similar cuts are made, but with a bevel. If necessary, the junction of two beams is processed with a chisel.
Such connections are fixed with nails and L-shaped connections.
Floor insulation
You can insulate the floors of a frame shed with the following materials:
- Mineral wool.
This method is very popular due to its ease of installation and relatively low price. Mineral wool is usually sold in packs of several slabs measuring 1000x600x50 mm or 1200x600x50 mm or in rolls. A waterproofing layer (glassine, roofing felt or ordinary polyethylene film) is laid on the floors of the barn, on which a wooden sheathing of boards with a section of 10x120 mm and a step width of 60 cm is placed. Mineral wool slabs are laid in the resulting compartments. All wooden elements of the sheathing, before laying the wool, must be treated with antiseptic agents to prevent rotting. For additional floor insulation, a double layer of such slabs is used. During installation, the insulation should be below the level of the sheathing. Mineral wool cannot be compacted, as it will lose its thermal insulation property. To prevent the cotton wool from getting wet, a layer of polyethylene is laid on top, secured to the staples using a stapler. Then the entire surface is covered with tongue and groove boards, OSB sheets or plywood.
- Styrofoam.
The floor is insulated with this material using joists. As in the case of mineral wool, it is necessary wooden sheathing, under which a waterproofing layer is laid. The width of the step between the boards is about 60 cm. The thickness of the foam boards should be at least 10 cm. This material is very convenient, as it does not deform. Foam plastic is not afraid of fungus and mold. The foam boards must be laid tightly. If any gaps remain, they can be filled with foam. After it dries, sheets of plywood or tongue and groove boards are laid on top.
- Expanded clay.
To insulate the floor of a shed with expanded clay, it is necessary to cover the lower formwork with waterproofing material, on top of which OSB boards are laid. Then a wooden sheathing made of boards with a section of 10x150 mm is installed on this surface. Expanded clay is poured into each section of this structure. Its layer should not be less than 10–15 cm, since a smaller thickness will not give the desired insulation effect. Expanded clay should be leveled so that it does not rise above the sheathing bars. Then a vapor barrier layer is laid on top of: a diffuse membrane, a bitumen-polymer cold emulsion on water based, polyethylene or polypropylene film. After this, the OSB sheets are attached to the joists with self-tapping screws. The finishing floor is laid on top.
Materials for floor insulation in a frame barn
 This is an environmentally friendly material, the production of which does not use chemical additives. This material is easy to give the desired shape. An inexpensive and reliable way to insulate the floor.
Insulation for walls
To insulate the walls of a frame shed, mineral wool and extruded polystyrene foam (penoplex) are most often used.
- Insulation of walls with mineral wool.
Finishing walls with mineral wool is not much different from a similar method of floor insulation, but it has its own nuances. On the inside of the shed, it is covered with a vapor barrier material (foiled polyethylene), on top of which plywood or OSB sheets are fixed. Outside, wooden cladding made of boards with a cross-section of 20x40 mm can be installed on mineral wool, perpendicular to the base. These boards serve as a ventilation gap onto which the exterior trim is attached. Sometimes a layer of OSB sheets is installed in front of the waterproofing layer (exterior finishing).
- Penoplex.
To insulate walls with this material, it is necessary to select slabs with a thickness of at least 6 cm. As in the previous methods, a wooden sheathing with a pitch of 60 cm is required, under which a waterproofing layer is placed. It is more convenient to fix Penoplex boards with polyurethane glue (it is well compatible with polystyrene foam) or with metal anchors with plastic dowels. The joints of the slabs are additionally fixed to polyurethane foam or metal tape. The outside wall can be insulated with an additional layer of penoplex, on which external finishing material is installed.
When the walls are fixed with anchors or dried glue, a vapor barrier material is placed on top. In this method of insulation, foamed foil polyethylene with a thickness of 3 mm is used. As a replacement, you can use polyethylene foil film. The finishing layer is fixed on top.
Materials for insulating the walls of a frame shed
 The light weight of the wool is convenient for installation. This material has a denser structure than foam plastic.
Video: all stages of construction
A frame shed on your property will always be convenient for storing equipment and old things. Having equipped its premises as a workshop, you can do carpentry and repair work, while your yard will remain clean. Insulated walls, floors and roof will provide comfortable conditions for keeping pets and birds during the cold season.