Laboratory work "Assembling an electrical circuit and measuring current strength in its various sections." Assembling an electrical circuit and measuring the current in its various sections How to assemble an electrical circuit laboratory work
Assembling an electrical circuit and measuring the current in its various sections.
Purpose of the work: verify from experience that the current strength in different series-connected sections of the circuit is the same.
This is your first electrical lab. In general, laboratory work on electricity is no more dangerous than changing the battery in a flashlight or electronic toy. But you will probably need to use your skills in working with electrical circuits and electrical appliances in the future, both in laboratory work in high school and at home. Therefore, we recommend that you listen carefully to what the teacher talks about safety precautions. It will be useful in life.
So in this lab we are going to measure the current in a circuit. We remember from the textbook that the current strength is equal to the ratio of the electric charge passing through the cross section of the conductor to the time of its passage.
If we use an analogy with a gutter through which water flows, then the current strength can be called the ratio of the volume of water passing through the cross-section of the gutter to the time of its passage. If water flows freely through the gutter, without accumulating anywhere, then the time it takes for one total volume of water to pass through the cross-section of the gutter is the same in any place. The same is true with electric current. The current strength in different sections of the circuit, where all devices are connected in series, is the same. What we have to verify from experience.
An example of the work being done.


1. What do the “+” and “-” signs near the device terminals mean?
These signs indicate the poles of the current source to which the device must be connected.
2. What is the maximum current strength it can measure?
3. What is the price of division of its scale?
What is the smallest current that can be measured by this device?
$C = 0.05 A$; $I_(min) = \frac(0.05)(2) = 0.025 A$.
2. Assembling an electrical circuit and measuring the current in it.
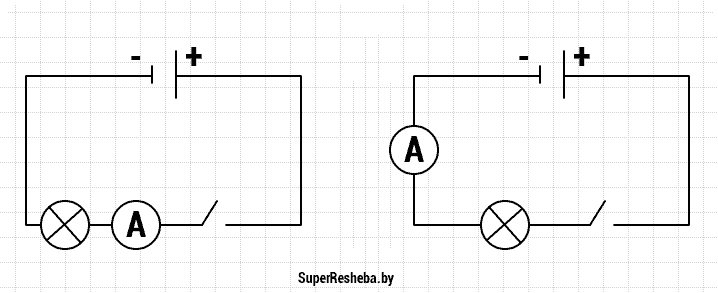
1. Assemble the electrical circuit according to the figure. Check the correct assembly with a teacher! Complete the circuit.
2. Draw a circuit diagram and use a solid arrow to indicate the direction of current in the circuit, and a dotted arrow to indicate the direction of movement of charge carriers.
3. Reverse the direction of current in the circuit. Check the circuit with the teacher! Write how you did it and whether changing the direction of the current affected the strength of the current and the glow of the light bulb.
We swapped the wires on the current source and ammeter. The current strength has not changed.
4. Measure and enter into the table the values of the current flowing between the “+” terminal of the current source and the key (section 1); current flowing between the key and the light bulb (section 3); current strength I4 flowing between the light bulb and the “-” terminal of the current source (section 4). Draw conclusions about the current strength in different sections of the circuit.
$I_1 = 0.5 A$;
$I_2 = 0.5 A$;
$I_3 = 0.5 A$;
$I_4 = 1.25 A$.
5. Draw circuit diagrams for measuring currents $I_3$ and $I_4$.
Scheme 2 and Scheme 3
6. Replace the light bulb in the last circuit, first with a resistor on the socket, then with a resistor on the holders. Measure and enter into the table the values of the current strength in them $I_4"$ and $I_4"$.
7. Compare the current strengths of $I_4$, $I_3"$ and $I_4"$ and draw conclusions.
$I_1 = I_2 = I_3$;
$I_3< I_4$.
Turning on an ammeter at various points in the circuit does not change the current, but replacing a light bulb with a resistor changes the current.
3. Answers to security questions/
1. Why is the current strength in different parts of the circuit the same?
Because current flows in different parts of the circuit in the same amount of time.
2. Will exclusion from the ammeter circuit affect the glow of the light bulb? Why?
No, it won't affect it. Because the ammeter has low resistance and consumes virtually no electricity.
Laboratory work→ number 1
Equipment: power supply, light bulb on stand, ammeter, key, connecting wires.
Instructions for performing the work
1. Consider an ammeter. Pay attention to the “+” and “-” signs at its clamps. Draw the ammeter scale (without the arrow) in your notebook. Determine the division price of the device.
2. Draw a diagram of an electrical circuit consisting of series-connected devices listed in the equipment list. Assemble this chain. To do this, place all the devices on the table in the same order as they are shown in the diagram, and then connect them with wires.
3. Measure the current in the circuit. On the ammeter scale that was drawn in your notebook, draw an arrow indicating the corresponding current strength. Write down the ammeter readings in your notebook.
4. Measure the current on another section of the circuit. To do this, turn off the power source, move the ammeter to another location in the circuit, and turn the circuit back on. Compare the ammeter reading with the previous one. Draw a conclusion.
The first work in the laboratory workshop is very simple and will not take you much time. In it you will assemble a simple serial electrical circuit and measure the current in its various sections using an ammeter. Since the circuit is series, it should be expected that the current strength measured in different sections is the same (within the error). If this is not the case, then this means that you made a mistake and you should redo the work.
Example of doing the job:
Ammeter division value:
Ammeter readings in the first case: I1 = 0.5 A. Ammeter readings in the second case: I2 = 0.5 A.


Conclusion: the current strength in different sections of the series circuit is the same.
ELECTRICITY IS ALL AROUND, THE FACTORY AND HOUSE ARE FULL OF IT, CHARGES EVERYWHERE: HERE AND HERE, IN ANY ATOM “LIVE”. AND IF SUDDENLY THEY RUNN, THEN THEN THEY CREATE CURRENTS, THE CURRENTS HELP US VERY MUCH, THEY MAKE LIFE DRAMATICALLY EASIER! IT IS AMAZING, FOR OUR GOOD, ALL WIRE “MAJESTY” IS CALLED “ELECTRICITY!”
: Continue the sentences: The current source, receivers, closing devices connected to each other by wires make up... For there to be current in a circuit, it must be... Drawings that show methods of connecting electrical devices in a circuit are called...


I=q/t, where I is current strength, q is electric charge, t is time. For the first time, the definition of current strength was given by Andre-Marie Ampere () - a French scientist, physicist and mathematician.


In everyday life, we are surrounded by electrical appliances, we use them, so we need to know what the current strength in the electrical circuit should be for the devices to work normally. We must know what maximum current we can supply to a particular wire, otherwise it will melt , or it will burn. The current strength is also taken into account when performing electrical installation and electrical repair work.


When an ammeter is connected to a circuit, like any measuring device, it should not affect the measured value; when it is connected to a circuit, the current strength in it almost does not change. Ammeters are used with different division values (determine the division value of the ammeter). What is the maximum current rating for it? The current cannot be exceeded, otherwise the device will be damaged.


Before starting the task, let us repeat the safety rules when working with electrical appliances: 1. Be careful and disciplined, follow the teacher’s instructions exactly. 2. Do not start work without the teacher’s permission. 3. When conducting experiments, do not allow extreme loads on the measuring instruments. 4. When assembling the electrical circuit, avoid crossing the wires. 5. Turn on the assembled circuit only after checking and with the permission of the teacher. 6.When finished, turn off the power source, and then disassemble the electrical circuit.

Homework Design task: Create a design for an electrical circuit for lighting the room. The circuit must ensure that the following conditions are met: three lamps with separate switching provide light to the room; when one lamp burns out or turns off, the others do not go out; there is an automatic disconnection of the circuit from the current source in the event of a short circuit; current source is a galvanic element.

When working with electrical appliances, you must strictly and strictly follow safety precautions, otherwise your life will be in danger. Current strength at a frequency of 50 Hz Effect of current 0-0.5 mA Absent 0.5-2 mA Loss of sensitivity 2-10 mA Pain, muscle contractions increasing effects on muscles, some damage mA respiratory paralysis 100 mA-3 A urgent resuscitation is required More than 3 A Cardiac arrest. Severe burns. (If the shock was brief, then the heart can be resuscitated)

"Guess the words" REMAP (unit of physical quantity) LUNOK (unit of physical quantity) ROSOLTIYA (a body that is made of a dielectric) SLEKERPOKT (physical device) NORTKELE (particle with the smallest charge in nature)

Types of independent work:
Preparation of presentations or reports “Electric field” in my future profession.
Preparation of presentations or reports “Electromagnetic phenomena” in my future profession.
Literature:
Myakishev G.Ya., Bukhotsev B.B. Physics 10 M.: Enlightenment. 2000, from 91-128,133-146,150-162
Myakishev G.Ya., Bukhotsev B.B. Physics 11 M.: Enlightenment. 2000, from 4-19, 94-129
Dmitrieva V.F. Physics: Textbook for secondary specialized educational institutions M.: Academy, 2010, p.117-138
Learning Tools:
Topic 1.4. Atomic structure and quantum physics
Knowledge requirements:
mechanism of thermal radiation;
quantum nature of light, Planck's hypothesis;
laws of external photoelectric effect;
Einstein's equation for the photoelectric effect, light pressure;
the essence of Rutherford's experiments, the model of the atom of Rutherford and Bohr, the composition of the atomic nucleus;
experimental methods for recording charged particles;
the essence of radioactivity, the composition of radioactive radiation and its characteristics;
the physical essence of the nature of nuclear forces and mass defect;
mechanism of fission of heavy atomic nuclei, operating principle of a nuclear reactor;
development of nuclear energy and environmental problems;
the essence of thermonuclear fusion;
achievements of scientists in solving the problem of controlled thermonuclear reaction, the structure of the sun and stars, the main stages of the evolution of stars.
Skill Requirements:
solve problems using the photoelectric effect equation to calculate the energy and momentum of a photon;
formulate Bohr's postulates;
explain the properties of elementary particles;
solve problems on using the law of radioactive decay, on using the mass defect and binding energy in the nucleus, on drawing up equations of nuclear reactions;
calculate the energy yield of a thermonuclear reaction;
solve problems on maintaining the energy balance during thermonuclear reactions.
Photoelectric effect and corpuscular properties of light. Use of the photoelectric effect in technology. Structure of the atom: planetary model and Bohr model. Absorption and emission of light by an atom. Quantization of energy. Operating principle and use of laser.
The structure of the atomic nucleus. Radioactive radiation and its effect on living organisms. Energy of fission of an atomic nucleus. Nuclear energy and environmental problems associated with its use.
Demonstrations
Photo effect.
Photocell.
Laser radiation.
Ionizing radiation counter.
Types of independent work:
Compilation of a reference summary “Structure of the Atom”
Literature:
Myakishev G.Ya., Bukhotsev B.B. Physics 11 M.: Enlightenment. 2000, from 160-170, 185-220
Dmitrieva V.F. Physics: Textbook for secondary specialized educational institutions M.: Academy, 2010, pp. 348-362,367-412
Learning Tools: Necessary equipment for laboratory work, Interactive whiteboard, PC, slide presentations.
Section 2. Chemistry with environmental elements
Topic 2.1 Water, solutions
Knowledge requirements:
water pollution, treatment methods;
water desalination;
water and its biological role;
the role of water in the life of cells and organisms;
water cycle in nature;
chemical and physical properties of water;
dissolution of substances in water;
Earth's water resources;
use of water in industry, agriculture and everyday life;
Skill Requirements:
determination of contaminants in water;
determination of water hardness and ways to eliminate it;
properties of water;
minerals.
Water is all around us. Physical and chemical properties of water. Dissolution of solids and gases. The mass fraction of a substance in a solution as a way of expressing the composition of the solution.
Water resources of the Earth. Water quality. Water pollutants and treatment methods. Hard water and its softening. Water desalination.
Demonstrations Physical properties of water: surface tension, wetting. Dependence of solubility of solids and gases on temperature. Methods for separating mixtures: filtration, distillation, separating funnel.
Laboratory work No. 6.Preparation of solutions with a given mass fraction of dissolved substance.
Laboratory work No. 7.Purification of contaminated water.
Types of student independent work: Prepare a project for saving domestic water consumption. What information do the labels on mineral water bottles carry?
Literature: Gabrilyan O.S. Chemistry. – M..: Bustard, 2009 -223 p.
Learning Tools: diagram of the water cycle in nature; transparent flat-bottomed glass cylinder, 2-2.5 cm in diameter, 30 - 35 cm in height, 250 ml measuring cylinder, distilled water.