Foundation Tise drilling technology. How is the foundation built and what is good about it? Yew system bearing capacity of pillars
When planning to build your own home, you cannot ignore the soil characteristics of the building site. There is such a thing as soil heaving. It characterizes the ability of soil to change volume with seasonal temperature changes. Indicators vary depending on soil moisture and temperature differences. Construction of a conventional pile- strip foundation in this situation it is not entirely justified, since there is a high risk that the support pillars will be pushed out. And the use of a foundation using TISE technology allows you to avoid such problems. The pillar with an expansion at the bottom is securely strengthened in the ground, and the freezing ground will not be able to exert the necessary pressure on it to change its position. This is far from its only advantage. The article will discuss how to make a TISE foundation with your own hands.
The principle of choosing a foundation depending on the type of soil
A meco-buried foundation (MSF) becomes the only available solution if the occurrence of groundwater is too close, and the possibility of its removal or the construction of drainage is impossible due to various circumstances. With its construction, another problem arises: throughout the cold season, the force of frost heaving will raise the foundation. And in the spring, after the soil warms up, the base will return to its place, but with minor shifts. This phenomenon is not considered particularly destructive for wooden houses, but such displacements are strictly contraindicated for stone buildings.
- Considering the above, a shallow foundation is good to use on sandy soils. And if it is installed on soils prone to heaving, then only if the planned structure is not large in size and weight. You cannot do without reinforcing the walls and the foundation itself.
- The universal foundation using TISE technology makes it possible not to take into account the described soil features. The close occurrence of groundwater and a high degree of heaving in winter will not affect the strength characteristics of a house built on a foundation of this type.

TISE foundation
- Individual construction from any material requires a high-quality foundation. Majority existing species involve significant financial expenses, while the budget is often not designed for them at all. Therefore, the main principles were price (which is three to four times lower than analogues) and safety for the environment. At the same time, efficiency did not affect comfort at all.
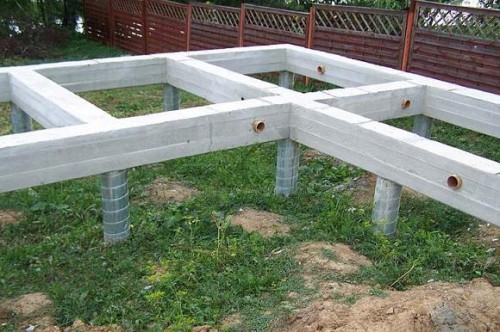
- The date of “birth” of the TISE strip foundation can be considered the 90s of the 20th century. Then a drill was developed that made it possible to create a recess for piles with a lower expansion, and all installation costs were reduced to a minimum. The expansion at the base of the pillar greatly increases its load-bearing capacity and increases its resistance to the destructive force of freezing soil. Further development of the technology was marked by the fact that the developer proposed to raise the grillage connecting the piles to a distance of 10-15 cm from the ground. This made it possible to free it from the loads inevitably exerted by the swelling soil.
Its reliability allows you to build buildings on different types of soil:
- clay;
- loam;
- sandy soils;
- sandy loam.
A certain limitation in its use is imposed only by the presence of quicksand on the site. It will not allow creating a high-quality foundation for laying piles.
The purpose of the building does not matter: a house, a garage, a bathhouse or a barn - for the universal TISE foundation there are no obstacles in terms of these parameters, as well as in terms of the material used. You can build from brick, foam blocks, timber - the same stability will be ensured in any case. This technology is ideal for low-rise private construction.
Pile foundation tise
- The pile has one feature - an expansion at the bottom equal to 60 cm. With the advent of a drill capable of making the necessary deepening in the ground, the installation process is no longer considered difficult and time-consuming. On the contrary, the speed of construction has become one of the advantages of the TISE foundation.
- It would be a mistake to call such piles an innovative development. Foundation pillars, increasing in radius in the supporting part, have been known to builders since the mid-28th century. Another thing is that enlarging the well from below was not achieved in the most convenient and safe ways, from special nozzles to the use of blasting.
Having made the necessary calculations for the TISE foundation, you can begin its installation.
Foundation chise drilling technology
- The easiest way to work is in sandy soils. Clay and loam are tougher and more difficult to drill. But solid soil will not require significant expansion.
- Drilling occurs to the required depth, but the supporting part of the pile must be located entirely below the freezing level. A significant size stone that gets in the way can create certain difficulties. Then the drill will not be able to pass it. In this case, you will have to remove the obstacle manually.
- When the groundwater level is low, the drilled well must be immediately filled with concrete to prevent collapse.

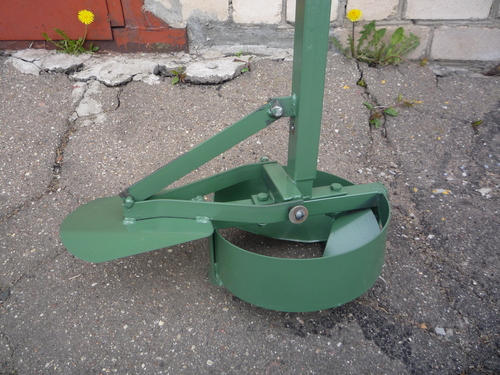
- The drill itself has a simple design, but it makes it easy to create a recess of the required shape and depth. Mechanism elements:
- vertical stand with handles;
- folding knife with traction;
- a container for collecting soil and cutters located at the bottom for entering the soil.
- The operator begins the drilling process, which at the first stage does not differ from the usual one, and when the desired depth level is reached, the knife is folded back. Thanks to traction, it continues to select soil, which in turn is collected in a container and easily removed.
Among the common drill models are TISE F300, F250 and F200. The numbers after the letter designation indicate the diameter of the hole in mm.
How to perform reinforcement correctly
Both the columnar base itself and the grillage will require reinforcement.
Strengthening piles
- The purpose of this procedure is to prevent destruction of the expanded base and the support itself during the process of freezing and swelling of the soil. For reinforcement, reinforcement with a diameter of 10 - 12 mm is taken, formed into U-shaped rods. They are connected at the top with wire.
- Before installing the fittings, it must be cleaned of dirt, corrosion and paint (if any). This procedure is performed using a metal brush. It is needed so that the remnants of the old coating and dirt do not interfere with the adhesion of the rods and mortar.

- Any long material of suitable diameter is suitable for reinforcement. The main condition is that it does not have a cavity. That is, the use of pipes is considered unacceptable, since liquid accidentally getting inside it during frosts will cause cracking of the reinforcement, and subsequently the destruction of the pole.
- When reinforcing the pile itself, you need to ensure that the reinforcing material passes through the center and does not move to the edges.
Principles of grillage reinforcement
- The diameter of the reinforcement used for this purpose is 10-14 mm. This is a case where more is not better. The inappropriateness of using a material that is thicker in girth is explained by the fact that it will come into contact with concrete much worse. You can calculate the number of rods depending on their diameter. The data is shown in the table.
- The rod is cut to length so that it does not reach a couple of centimeters to the transverse sides of the formwork. When forming T-shaped connections and when creating corners, the reinforcement elements do not require fastening to each other. It is quite simple to extend a rod that is missing in length: two pieces are simply overlapped.

Installation proceeds as follows:
- waterproofing of the formwork is carried out;
- “cakes” of solution are thrown onto the insulating layer at intervals of 1 or 1.5 meters. They should not be large, 5-6 cm will be enough;
- the bottom layer of reinforcement is laid on the formed “cakes”;
- concrete is poured, slightly short of the edge of the formwork;
- a second layer of reinforcement is laid on the solution;
- filling is completed to the very top.
Concreting piles
Some difficulties will arise if the groundwater level is high enough. As already mentioned, this feature will require grouting immediately after drilling work. If this could not be done quickly, or the water has managed to fill the well, it will have to be pumped out or bailed out.

Filling will occur in stages:
- expansion is reinforced;
- a wide element of the pile is poured;
- the pillar itself is strengthened;
- a “shirt” made of roofing felt is installed;
- final concreting of the pile.
Installation of TISE grillage
The final stage in creating a foundation using TISE technology is the grillage. Its installation begins after the piles have completely hardened (after about 3 days). Its height for houses made of wood or panel buildings is 20 cm, for brick ones - 40 cm. The width in any case is calculated based on the thickness of the walls. The need to raise the grillage has already been mentioned above. There are no structural differences between it and the usual “buried” option. The only difference is the level of placement. This “suspended state” provides the advantages of the foundation in the following indicators:
- savings on materials for waterproofing. You can complete all the work with five to six rolls of roofing felt in the regular price category;
- rising above ground level will not allow the foundation to break on soils prone to seasonal heaving;
- such a “gap” creates a perfectly ventilated space - an excellent preventive measure against mold, dampness and fungal growth;
- the volume of excavation work is reduced to a minimum.
If the building is located on a site with a large slope, then the element will be stepped, and a small rise implies a grillage with variable height.
Stages of work
- First, the area between the piles is filled with soil, slag or sand to the level of the concrete foundations. The width of the “embankment” must correspond to the thickness of the foundation strip with an allowance of 200 mm. Everything is carefully compacted. Ruberoid or polyethylene is laid on top.

- Formwork is done using stakes and edged boards. A little more material will be required than when constructing formwork using other technology, but this condition cannot be considered a significant drawback.
- It is advisable to carry out the cementing procedure as quickly as possible, no more than two days. It is preferable to complete the filling within a day. A smooth base can be achieved by covering the formwork with roofing felt. Do not perform work at sub-zero temperatures.
- The formwork is removed on the 22nd day after pouring and the embankment can be removed from under the grillage. The beam can be covered with a layer of liquid waterproofing. If in the future there are plans to build walls using TISE technology, then the entire surface of the grillage is covered except for that which will be in direct contact with the wall.
The procedure for carrying out work during the construction of a foundation using TISE technology

All actions fit into ten main stages
- You will need to mark the axes of the foundation.
- Mark the locations of the piles.
- Drill wells.
- Waterproof the walls.
- Install the prepared frames into the wells according to the technology.
- Fill the foundation pillars.
- Outline the level of the future grillage.
- Install the formwork.
- Create a waterproofing layer for the formwork walls.
- Reinforce and fill the grillage.
Chise foundation video
Individual construction, like any other, pursues the goal of saving money without losing quality. The foundation using TISE technology, meeting these requirements, also allows you to take care of natural resources, and a home craftsman with average construction skills can handle it. Costs have already been kept to a minimum, so it is strictly not recommended to try to save on the quality of concrete or reinforcing material. Decent quality of “raw materials” will allow the foundation to serve more than one generation of house residents.
The TISE foundation is a popular foundation in low-rise construction, suitable for the construction of frame houses and buildings made of wood (timber and logs), foam concrete and brick 1-3 floors high. The key advantage of this technology is the ability to implement all stages of construction with your own hands, without the use of special equipment.
This article discusses the foundation of TISE technology. You will learn the pros and cons of this method, design features and foundation calculation technology, and also receive detailed instructions for its construction.
Design features of the TISE foundation
The foundation using TISE technology was invented by the Soviet design engineer R. N. Yakovlev, who published his findings in the books “New construction method - TISE technology” and “Universal foundation TISE”.
The TISE foundation is a pile-tape structure consisting of two structural elements:
- support piles;
- tape grillage.
The functional task of piles is to transfer the load coming from the mass of the house to a deep, high-density soil layer. TISE piles have a dome-shaped expansion in the lower part, due to which an increase in the stability and bearing capacity of the support is achieved. This solution allows for the construction of heavy houses in low-density soil conditions, where conventional piles will shrink, leading to deformation of the building walls.

The construction of piles is carried out by developing wells on the site (using a special TISE-F drill) and concreting them with a mixture of grade M200-M300. The supports are necessarily reinforced with a longitudinal frame made of hot-rolled fittings with a diameter of 12-16 mm, in this case, the reinforced frame of the piles is connected to the frame of the grillage, which ensures maximum rigidity and reliability of the foundation.
The supports are tied with a monolithic reinforced concrete grillage of tape type. The grillage connects separate piles into a single structure, which increases their resistance to deformation under the influence of overturning loads. The grillage also acts as a supporting surface on which the basement floor is placed and the walls of the brick house are erected.
Advantages and Disadvantages
As the inventor of the method, R. N. Yakovlev, states, one of the main advantages of this technology is its cost-effectiveness. The author provides the following calculations: the construction of a strip foundation with a cross-section of 70 * 40 cm and a length of 30 m requires: 0.7 * 0.4 * 30 = 8.4 m 3 of concrete, whereas to build a TISE foundation of 20 piles 1.2 m long and 0.6 mm in diameter, having a similar load-bearing capacity ability, no more than 2 cubic meters of concrete are required.
Let's look at the advantages this method has:
- the ability to build the TISE foundation with your own hands, without the use of special equipment;
- minimal amount of excavation work - there is no need to level the site and develop a trench, as is the case with a strip base;
- construction autonomy - no need for electricity, with the exception of power supply to the concrete mixer, which can be connected to a generator;
- high stability of the foundation in heaving and moving soils, the ability to build a house in low-density soil conditions;
- durability - if the construction technology is followed, the foundation will last over 100 years;
- The TISE foundation is universal - it is suitable for the construction of low-rise buildings of any weight and configuration.

The TISE method has numerous advantages, but it also has disadvantages. According to reviews, the construction process is accompanied by enormous labor costs, since all work is done manually. Let us note the difficulty of developing wells for piles in conditions of highly hard soils, which are extremely problematic to drill with hand tools.
Additional disadvantages of this method are the impossibility of arranging the basement floor, and the low stability of piles in swampy and water-saturated soils. However, in general, the advantages of this technology are more significant than the disadvantages, and its implementation in individual construction is fully justified.
Calculation method
Calculation of the foundation consists of determining the depth, number and spacing of supports. TISE drills used to develop wells make it possible to form piles with a diameter of 250, 500 and 600 mm; the load-bearing capacity of each size of pillars is given in the tables inside the instructions.
- Calculate the total mass of the building being constructed. To do this, the area of the individual structural elements of the house - walls, roof and ceilings - is multiplied by the specific gravity m 2 of the building material from which they are constructed.


The depth of the pillars depends on the level of soil freezing in your region. Use the map below and determine its size. Wells must be drilled so that the support base of the pillar is located 20 cm below the soil freezing line.

All that remains is to draw up a diagram for placing the supports in the foundation - they must be present at the corners of the house and at the intersections of the walls, the remaining number of pillars is distributed at even intervals along the perimeter of the building (optimal distance 2-2.5 m).
DIY TISE foundation (video)
TISE foundation construction technology
Construction begins with marking the foundation - using reinforcing stakes you need to mark the drilling sites for the piles. A string is stretched between the stakes, which indicates the contours of the walls of the house. After marking, you need to check the right angles using the Egyptian triangle method - at a distance of 3 m from the corner peg, a mark is made on the string, the same mark, but at a distance of 4 m, is made on the perpendicular side. Next, the diagonal is measured - if it is 5 meters, then the angle is correct.
Do-it-yourself TISE piles are made using the following technology:

You can tie the TISE foundation with a grillage after two weeks after pouring the pillars, during which they gain their design strength. The supports are tied with a grillage with a cross section of 40*40 cm.
Grillage installation technology:

At this point, the columnar foundation with a grillage using TISE technology can be considered ready. The walls of the house can be erected after a 28-day period for the structure to gain strength.
The load from the floors is determined by the material of the floors themselves and the density of the insulation or sound protection layer used.
With some reserve, we will offer a design load of 1 sq. m of overlap with a span of 6 meters:
with insulation density 200 kg/m3.....70 - 100 kg/m2
- attic on wooden beams
with insulation density 500 kg/m3 ...150 - 200 kg/m2;
with insulation density 200 kg/m3....100 - 150 kg/m2;
- basement on wooden beams
with insulation density 500 kg/m3 „..200 - 300 kg/m2;
When determining the pressure of floors on walls, it is necessary to take into account that the load from them and from the operational load is distributed to a greater extent between the load-bearing walls on which the beams or floor slabs rest. At monolithic ceiling the load falls evenly on all walls.
Operational load (furniture, equipment.-) A uniform distribution of the load over the entire area of the floors is assumed:
for basement and interfloor ceilings - 210 kg/m2;
for the attic floor……………………105 kg/m2.
The weight from the walls is determined for each specific case, based on the weight of construction and finishing materials.
When calculating the weight of the house, it is necessary to take into account both the proposed future redevelopment of the premises and the increase in the number of storeys of the house (if this is envisaged).
The bearing capacity of the supports is determined by the type of soil.
Table 1.1 shows the load-bearing capacity of one foundation column created using TISE technology. It is determined based on the strength of the soil and the diameter of its supporting surface.
The solid state of clay corresponds to its normal moisture content. High plasticity of clay corresponds to the maximum saturation of clay with water at high porosity and is extremely rare.
In most cases, when choosing the calculated bearing capacity of the soil, it is recommended to assign its average value (average for low and high plasticity).
|
Plasticity (for clay) |
Estimated resistance Ground (kg/sq.cm) |
Pole bearing capacity (t) With support diameter (cm) |
||||
|
Clay |
Semi-solid |
|||||
|
Resistant |
||||||
|
Soft-plastic |
||||||
|
Sandy loam and loam |
Semi-solid |
|||||
|
Resistant |
||||||
|
Soft-plastic |
||||||
|
Loess |
Soft-plastic |
|||||
|
Sands |
Average |
|||||
|
Sands |
small |
|||||
|
Sands |
Dusty |
|||||
Table 1.1. Bearing capacity of foundation pillars
(here is a plate from Yakovlev’s book. There, the weakest loam is given with an indicator of 3.5 kg / sq. cm and with such resistance a pole with a 60 cm heel can be loaded up to 8 tons. To be on the safe side, I took 6 tons for the pole, although at the heel level it was difficult even for a thick one hammer the ground with a corner.)
The value of the bearing capacity of soils in the table is given for a depth of about 1.5 m. At the surface it is almost 1.5 times lower.
When determining the number of foundation pillars, it is necessary to increase the design load by 25 - 30% to create a certain safety margin that covers inaccuracies in the selection of initial data. In addition, under an internal load-bearing wall loaded with floor beams (slabs) on both sides, it is advisable to reduce the pitch of the pillars by 20 - 30% compared to external walls.
The pitch of the foundation pillars, when constructing stone walls using TISE technology, should not be made more than 2-Zm. This allows you to get by with a small cross-section of the grillage tape. The pillars along the outer perimeter of the foundation are located at its corners and at the intersection with the internal walls of the house.
Let's determine the layout of the foundation pillars for a two-story house 6.7x7.3 meters with an internal load-bearing wall and a flat roof. We will carry out this calculation with some reserve.
Construction is carried out on loamy soft-plastic soil (the load-bearing capacity of the soil is assumed to be 3 kg/cm2), we take the worst option for the safety margin.
Roof area................................................... ........................73 m2
Attic floor area...................................................40 m2
Total floor area of the first
and the second floor is .................................................... ......... 80 m2
Volume of load-bearing walls…………………………………….…… 75 m3
General perimeter of the foundation......................................................... .....34 m
Weight of the roof with asbestos cement sheets (50 kg/m2)...................3.7 t
Weight of the attic floor wood (150 kg/m2)................................6 t
Weight of floors of the 1st and 2nd floors wood (200 kg/m2)............... 16 t
Weight of load-bearing walls (500kg/m3)………...................................... ...37.5 t
Weight of partition internal walls…………………......2 t
Foundation weight (grillage and pillars. 600 kg/linear m)...................20.4 t
Payload weight (people, equipment, furniture)...............10 t
Weight of snow cover (120 kg/m2)............................................ .......8.8 t
Total weight of the house................................................... ...........................105 t
To determine the design load, we will increase the total weight by 20%, i.e. we assume that it is about 125 tons.
Because the internal wall is loaded with floors on both sides, then we accept the pitch of the foundation pillars under internal wall 30% more often than under the external one.
One foundation pillar can withstand 6 tons according to the bearing capacity of the soil.
Thus, for wooden floors, 21 pillars are required.
With a foundation perimeter of 34 m, the calculated pitch of the pillars along the perimeter of the house will be approximately 1.6 m, and under the internal wall - 1.4 m. With an increase in the number of pillars, the reliability of the foundation will increase, although a large margin of safety has already been taken.
For large cottages, choose a distance between posts of 1.35-1.5 meters. If the number of pillars is 60, the soil will carry about 600 tons of load. This is at least a 3-fold safety margin for soil resistance. And themselves. b. The strength of the pillars will withstand a 9-story building
Calculation example - (Information taken from one of the forums)
So - it is necessary to calculate the load on the grillage. This load consists of
1 Ground floor wall masses
2 Second floor floor masses
3 Loads on the second floor floor
4 walls of the second floor
5 Roof masses
6 Snow load on the roof
Loads on floors are defined in SNiP and are (design load, standard load is always lower. “Design load” = “normative load” * “reliability factor”)
Attic space 91kgs/m2
o Apartments 195 kgf/m2
o Lobbies, corridors, stairs 360kgf/m2
o Balconies taking into account the load (uniform strip on an area 0.8 m wide along the balcony fence) 480 kgf/m2
o The load from the weight of the partitions is taken depending on the design and nature of the support, but not less than 50 kgf/m2 (normative load) - or 65 kgf/m2 (calculated)
The snow load on the roof depends on the area of the standard weight of the snow cover
My district (Ekaterinburg) - III - 180 kgf/m2
Belarus - II - III - 120 kgf/m2
Moscow-III - 180 kgf/m2
“Snow load” = “calculated value of snow cover on 1 m2 of horizontal surface of the earth” * “Transition coefficient from the weight of the snow cover to the snow load on the cover”
If the roof slope angle is less than or equal to 25o, then the coefficient is 1.
If the angle is greater than or equal to 60o, then the coefficient is 0.
Intermediate values are determined by interpolation
In the case of an adjoining, for example, garage or other lower extension, when the roof level of the extension is lower, a so-called a snow bag, and the load from it is considered separately (the maximum coefficient is 6, the length of the load is equal to two height differences between the extension and the roof, but not more than 16 m)
My roof angle is 34o so the transition factor is 0.755
So, adding everything together we get a load on the grillage of 164.4 tons,
This calculation does not claim to be absolutely accurate or correct. I am not a builder or a designer). So, if I'm wrong about something, please correct me.
Yes, here’s another thing - I forgot to add - I have a house 10*10m, 2 floors + attic. External walls - foam block, central internal - brick M125 380mm. The ceilings - as you already understood - one is monolithic reinforced concrete, the other is wooden. foam block walls 600*200*300
Any construction begins with the construction of a foundation. Its role is played by the foundation. In fact, this is the most important element in the design. After all, the stability of the house, and therefore the safety of its residents, depends on the foundation.
Great attention is paid to its construction. Let's look at the types and technologies of this process in more detail.
- Influence of groundwater.
- Laying depth.
- Types of foundation.
- How to prevent foundation movement?
- Waterproofing.
- TISE technology.
The influence of groundwater on the foundation
The main problem that builders face when laying a foundation is the impact of groundwater.
Typically, groundwater is divided into two types:
- Groundwater. This term refers to stagnant moisture in the ground, which, as a rule, has a regional location. Such waters occur in porous as well as loose rocks. Their level is prone to seasonal fluctuations due to precipitation, climate, as well as topography and terrain features.
- Verkhovodka. This term refers to underground water, which lies near the surface of the earth, but differs from groundwater in its inconstancy of distribution, as well as its lifetime.
It is formed as a result of precipitation, and evaporates in dry times.
What is the TISE foundation
The high water is also prone to fluctuations and, with significant amounts of precipitation, can reach large sizes.
When the groundwater level rises, erosion of the foundation may occur. When it decreases, it begins to settle. Thus, these fluctuations must be taken into account when drawing up a construction plan.
Before laying the foundation, the groundwater level is determined. Typically, a high level is considered to be water occurring at a depth of about 2 meters. Therefore, the foundation must be built approximately 50 cm from the location of groundwater. A low level of water occurrence is considered to be a depth of 2 m underground. It can be ignored.

Factors influencing flooding of buildings.
When constructing a foundation, it is advisable to carry out water protection measures.
This is done to prevent subsidence of the foundation. Water protection measures include: installation of waterproof screens under the building, arrangement of various communications (with the exception of the possibility of leakage), mechanisms for draining water beyond the boundaries of the building.
The danger of flooding of the building should not be ruled out.
Flooding occurs due to natural phenomena. Also, it can occur under the influence of technogenic factors:
- Active. Directly cause flooding (for example, due to a leak or breakthrough of utility networks).
- Passive. They do not cause flooding, but they contribute to it (for example, when surface flow is disrupted).
Foundation depth
The foundation depth is calculated taking into account several factors.
The type of soil in the construction area is of decisive importance. Builders distinguish several types of rocks that are often found in practice:
- Rocky soil, which is interconnected rocks that lie in a continuous mass. They are distinguished by strength, elasticity and resistance to cold. They do not deform and do not freeze. In fact, it is an excellent surface for a foundation.
- The sands are fine. These sands work well and allow water to pass through, and can also be compacted under load pressure.
The only drawback of this breed is weak compression. And the larger the mixture, the worse it perceives pressure. This sand may not be a good surface for a foundation.
- Sandy loam. This is coarse sand, with a large admixture of clay (about 5-10% of the composition).
Some varieties of sandy loam, when moisture is added, become very liquid, almost like water. Such sand is not suitable as a base for a foundation.
- Loams. Loams are a type of sand containing a large percentage of clay formations (10-30%). In terms of quality, this is the same breed as sandy loam. That is, it is also not suitable for constructing foundations.
Assessing the quality of the soil allows you to plan the construction of a future basement. The structures of basements and semi-basements consist of walls, which are the foundation of the building.
A modern basement involves placing a technical underground.
The technical underground usually houses the heating and water supply system of the house. Cables for power supply are also installed there. All this greatly simplifies the maintenance and repair of these elements.
At the site where the building is built, you need to remove the plant layer of soil and then move it to another place. The layer removed in this way can be used as material for arranging the area in front of the house.
Perhaps the key factor in calculating the depths for laying the foundation is the choice of the load-bearing soil layer. To do this, before construction, the engineering and geological features of the site are taken into account.
Based on the results, a conclusion is drawn as to which layer of the earth will be the basis for the foundation.
If the bearing layer is located at a distance of 3-5 m from the ground, pile foundations are used.
Foundation types
Builders distinguish several types of foundations in accordance with the properties and scope of their application.

Tape. The strip foundation usually has a prefabricated and conventional appearance. Prefabricated strip foundations consist of special cushion blocks and wall foundation blocks.
They are used to make the basis for buildings made of heavy material.
Columnar. Columnar foundation used as columns (supports) for the building frame.
Pile. This type of foundation is installed under a building if there is weak soil or to support heavy loads. The basis of this foundation are piles.
Measures to prevent foundations from moving
When building foundations, displacement may occur. This occurs due to horizontal soil forces that press on the foundations of buildings (along with the ground floor or basement).
To protect against displacement, after building the foundation and before filling the foundation pit with soil, lay the ceiling in the area of the floor on the 1st floor.
Waterproofing

The main point when building a foundation is waterproofing.
To properly protect your home from moisture, you need to waterproof it in a timely manner.
The choice of waterproofing type depends on the soil and its characteristics. When groundwater is 1 m or more below the foundation, only vertical or horizontal waterproofing can be done using bituminous materials.
Molten bitumen is applied to the walls so that the thickness is 3-5 cm. The hardened mixture protects the concrete well from the penetration of moisture into its pores.
The waterproofing device for buildings with and without a basement contains differences. In buildings without a basement and with no groundwater, there is enough horizontal waterproofing. In the case of the presence of groundwater, in addition to waterproofing, it is necessary to make a coating waterproofing of the floor.
If the building contains a basement, but there is no groundwater, it is also necessary to apply waterproofing to the walls and coating waterproofing of the floor in the basement.
If there is groundwater, then in addition to the walls, the floor is subjected to bitumen waterproofing.
TISE technology

Foundation construction technologies are constantly being improved and modernized.
Among cost-effective and economical methods, TISE technology stands out. TISE allows you to reduce not only financial, but also time costs for construction.
Use of modern building materials allow it to be durable and withstand significant loads during operation.
The device will allow you to install the foundation on various types soils, including highly heaving and frozen soils. With its help you can install the foundation for a permanent residential building.
Stages of foundation construction using TISE technology:
- Well preparation. Using a special drill, the well is drilled clockwise.
The drilling depth is usually 10-20 cm lower than the load-bearing soil. In heavy soil, the drilling process takes about 30 minutes.
- Installation of the foundation. Next, the well is filled with reinforcement and concrete. After this, a foundation frame called a “tar paper jacket” is inserted into the central part. The process ends with the construction of a foundation in the form of a columnar-ribbon form.
The technology has been used for more than 20 years.
During this time, a lot of people took advantage of it and got the opportunity to appreciate its benefits.
TISE foundation: we build it ourselves
Foundation built using TISE technology
In individual construction, the TISE foundation, which is a pile-grillage poured structure, is quite in demand. It is effective on different soils, regardless of the terrain (mountainous or flat) of the area. If the pouring instructions are followed, use is permissible in areas with increased seismic activity. In addition, according to reviews of many experts, its filling is economical and less labor-intensive.

Peculiarities
It comes down to pouring piles and a grillage (strip foundation) raised above the ground. For their production, concrete grades M 300–400 are used with the addition of crushed stone, fraction up to 25 mm. A prerequisite for the reliability of the structure is reinforcement. To increase the bearing capacity of the support, a hemispherical expansion is installed at its base. Therefore, even monolithic structures with a height of up to 3 floors do not shrink during operation.
The strip part of the foundation using TISE technology is reinforced and concreted in wooden formwork.
It rises 10–15 cm above ground level. This distance is required to compensate for internal stresses from winter heaving of the soil. When making a foundation with their own hands, some craftsmen decide not to fill the grillage and thereby deprive the structure of the necessary reliability.
Highlights
At the preliminary stage, the layer is removed fertile soil, although some masters claim that this operation can be neglected.
Next, the future foundation and drilling sites are marked, based on the distance between the supports being 1.5–2 m. The greater the expected load, the less this value should be. In case of a complex configuration, piles must also be poured in places of key elements.
A cast-off is constructed from thick boards (5 cm), and it is important to control the diagonals using a plumb line.
1. Creation of supports.
To obtain holes for piles using this technology, the TISE-F foundation drill is most often used, which has a sliding rod with marks, a soil storage tank and a folding plow controlled by a cord.
The design is convenient for independent work. Typically, deepening is carried out to a freezing level of + 10–15 cm. The latter is necessary to create an expansion of up to 600 mm at the base, while ensuring that the bar and plow rotate and the storage tank stands in place.
The complexity and duration of the process depends on the density of the soil; on average, one hole takes up to 90 minutes. In case of high soil moisture and sand, in order to avoid landslides, experts recommend immediately pouring the foundation piles.
An important technological stage is reinforcement. For this purpose, metal rods are used, 10–12 mm thick, 15–30 cm long longer than the depth.
The excess is needed for bending and for the air gap of the grillage. They are tied with wire on top, and it is also rational to use reinforcing elements bent in the shape of a “P”. They must be free of rust, grease and other contaminants. They are placed strictly in the center of the hole.

To waterproof the TISE foundation, roofing felt is most often used.
Its pieces are fastened into a cylinder and lowered into the well. After this, concrete is poured using technology. The solution is made moderately fluid to fill the well and not leave voids. Vibration compaction is also used for this purpose, otherwise, over time, the shortcomings of the foundation will appear.
The pouring is carried out immediately, to the design mark; for this, at the preliminary stage, formwork is made or available material is used (for example, a pipe of the required diameter).
2. Making the tape.
Experts do not recommend making a large grillage; its width should correspond to the required wall thickness and increase if additional cladding is planned.
To fill it, a formwork is constructed from wood, which is covered from the inside with polyethylene. Reinforcement is carried out by tying the protruding rods of the piles. The TISE foundation tape is made monolithic, that is, the solution is poured immediately over the entire structure.
It is important to get the top of the grillage perfectly flat (horizontal); this is controlled using a level or laser level.
Vibrators are used for compaction, however, when working independently, it is necessary to monitor the reinforcement - its displacement is unacceptable. During the setting period (about a week), the foundation is covered with film. When carrying out work on a slope, the tape will be stepped or have a slight slope.

People's opinions
“I purchased a summer cottage and decided to build a frame house.
I wanted it to be inexpensive and high quality. I read a review on the Internet about TISE (foundation pouring technology) and chose it. I first used the drill when building a fence, it turned out well and relatively quickly. In the spring I started the main work, did everything according to the instructions, and finished the house in the summer while on vacation.
I’m very pleased with the result.”
Sergey, Nizhny Novgorod.
“I decided to pour the foundation for the house myself, using TISE technology. I drilled holes for the piles with a special drill; the soil on the site was rocky, so the work did not proceed too quickly.
No further problems arose; if there were any shortcomings, I did not find them. One pillar required about 30 kg of cement - the solution was mixed to medium consistency. The walls are brick, all the internal work and external insulation have already been completed, the rooms are quite comfortable.”
Dmitry Samoilov, Voronezh.
“Last year I started building a house using TISE technology: the reviews about it are positive and it’s affordable.
I purchased a foundation drill, it is small, weighing less than 10 kg, and it is not difficult to handle it yourself. The foundation was poured within a month - I worked on weekends. The walls were erected with a friend, in my opinion everything turned out well. The first winter will show possible shortcomings.”
Kirill, St. Petersburg.
“The soil on my site is clayey, and from expert reviews it follows that it would be better to use construction using TISE technology.
I did all the work with my own hands: I checked the verticality with a plumb line, I bought M 400 concrete and 12 mm reinforcement for the posts. For a house 7.5 x 4.5 m on two floors, 19 of them were made, an odd number due to the need to install additional supports for complex frame units. The foundation stood unloaded during the winter and remained unchanged in the spring.
We’ve been living here for 3 years and no shortcomings have been identified yet.”
Ivan Belov, Moscow.
"Ordered construction country house turnkey. The soil on the site is peaty and experts recommended the use of TISE technology. According to calculations, it is about 2 times more efficient and economical than the traditional one. All work was carried out quickly and efficiently. The wells were drilled based on the freezing depth of + 10 cm, the grillage was raised by 15.
In the corridor, in the floor, a hatch was made to access the structure. We lived through the winter without incident.”
Nikita, Yekaterinburg.

Pros and cons, when to use effectively
The active use of foundations poured using TISE technology is determined by a large number its advantages:
- versatility;
- high resistance to frost heaving;
- relative cheapness, due to savings in materials and labor resources;
- high bearing capacity of the foundation;
- applicability in the reconstruction of buildings;
- cost-effectiveness (compared to classic tape) when pouring in areas with a slope;
- reliability of the design;
- durability of the foundation - concrete is not affected by aggressive soil components;
- simplicity of communications;
- good ventilation of the underground space.
For many positive factors Such construction is low speed, as well as the fact that it is carried out without the use of expensive special equipment.
According to reviews, the main disadvantage of the technology is that it requires a lot of effort on rocky soil. In this case, holes for the piles have to be dug manually. It is not recommended for waterlogged, silty and subsiding soils. Arranging a cellar under the entire building is also problematic. But it should be noted that the decisive factor is the quality of the work.
TISE construction is a universal foundation pouring technology with a wide range of applications.
Due to its characteristics, it is suitable for soils different types(dense clayey, sandy, swelling in winter) with a seasonal freezing depth of up to 2 m and any groundwater level. It is effective on flat and hilly areas for the construction of wooden (logs, beams), brick, frame, block or monolithic buildings for residential, commercial and other purposes.
The maximum permissible height is 3 floors. The design of the TISE foundation neutralizes the impact of vibrations on the house, therefore its use is recommended in areas with increased seismic activity, near busy highways and railways.

Price
When calculating the costs of building a turnkey TISE foundation, we take into account climatic conditions, soil features and future construction:
- number of storeys;
- location of load-bearing walls;
- places of nodal elements and others.
The construction organization carries out all the work on a turnkey basis (their cost for Moscow is shown in the table) or is involved at the stage of drilling and pouring the supports.
Calculation of the TISE foundation
The calculation of the TISE foundation determines the drilling depth, pitch and number of supports. This guide will help you avoid mistakes when calculating and constructing the TISE foundation.
We invite you to familiarize yourself with a very simple TISE foundation calculation methodology, the essence of which is to determine the bearing capacity of the soil. It will allow an individual developer to understand the principle and apply the method with a sufficient degree of accuracy to build a foundation using TISE technology with his own hands.
If it is necessary to obtain a complete and detailed calculation, when, for example, difficulties arise with determining the type of soil, the complexity and peculiarity of the terrain of the site, you need to contact qualified specialists.
The purpose of calculating the TISE foundation is to determine the load on the soil and the total area of the foundation supports, which will allow it to support the weight of the future building. To do this, you need to determine the weight of the house, the operating load, the load from snow cover and the load-bearing capacity of the support pillars.
House weight
How correctly the TISE foundation will be calculated depends on the accuracy of the calculation total weight building, which is determined by the load from the main components - foundation, walls, ceilings, floors, roof.
Knowing their dimensions and the specific gravity of the material used, we calculate the weight of each of them and the house as a whole using simple mathematical formulas.
 |
TISE foundation weight, since its parameters are the desired value, determined approximately, taking into account the materials used, design features, and depth of installation.
Wall weight depends on the building and finishing material.
So, 1m2 of a wall erected using adjustable formwork:
- TISE-2 weighs 270 kg;
- TISE-3 weighs 400 kg;
- from aerated concrete blocks 600*200*400 with a density of D500 - 250 kg.
- wooden beams and insulation with a density of 200 kg/m2 - up to 100 kg for the attic and up to 150 kg for the basement;
- reinforced concrete monolithic slabs – 500 kg;
- concrete hollow-core floor slabs – 350 kg.
Roof weight determined by the weight of the roofing pie materials.
1m2 of roof weighs:
- from slate – up to 50 kg;
- from ceramic tiles – up to 80 kg;
- from sheet steel – up to 30 kg.
These are furniture, engineering equipment and communications, household and economic equipment, people. The value is significant and cannot be neglected when calculating the foundation. If we assume that the load is distributed evenly over the area of the interfloor floors, we obtain the following values:
- basement and interfloor ceilings - up to 200 kg;
- attic floor – up to 100 kg.
This value for Ukrainian cities, as well as the mechanism for determining the snow load for roofs of different configurations, are determined by the relevant regulatory documents.
For snow load, a correction factor is introduced, the value of which depends on the angle of inclination of the roof.
Yes, for pitched roof it is equal to 1 regardless of the angle of inclination. For a gable roof with a slope of 250, the coefficient value is 1, with a slope from 260 to 60 0 - 1.25.
If the angle of inclination is greater than 600, then the snow load is not taken into account.
Having calculated the weight of the house, the foundation, the weight from the operating load and the snow cover, we sum up all the terms and multiply the result by a correction factor of 1.3 to ensure a safety margin, thus compensating for possible shortcomings when calculating the total weight of the house.
Bearing capacity of TISE foundation piles
The next step in calculating the TISE foundation will be to determine the load-bearing characteristics of the piles and soil.
The ability to withstand a particular load depends on the type of soil and the magnitude of its resistance. These soil characteristics are determined by construction regulations.
 |
The load-bearing characteristics of piles for the TISE foundation are given for dense sandy soils of average moisture and hard clay soils of low porosity.
!
Note to the developer
In practice, the load-bearing capacity of TISE foundation piles is usually higher.
Calculation of the TISE foundation
Due to the seepage of cement laitance into the soil around the expansion of the support, soil concrete is formed. The soil-concrete mass, in the absence of groundwater in the well, can reach a thickness of 5-10 cm, which increases the bearing capacity of the support by one and a half to two times.
Drilling depth for TISE foundation
The correctness of the calculation of the foundation and its reliability directly depends on the depth of drilling wells, which is determined by the level of soil freezing in a given area and should be 20 centimeters below this level.
 |
The map shows that the level of soil freezing depth in Ukraine lies in the range of 70-120 cm.
Calculation of the pitch and number of pillars for the TISE foundation
After we have calculated the weight of the house, figured out the soil resistance, bearing capacity of the supports and their depth, we move on to the final stage of calculating the TISE foundation - determining the number of piles and the step between them.
Let's say that we plan to build a house measuring 5 m by 10 m.
Construction will be carried out on clay soil. The house weighs 350 tons. Having the initial data, we find that the perimeter of our future foundation is 30 m. Clay has a bearing capacity of 6 kg/cm2. With a base expansion of 60 cm, the bearing capacity of the pillar will be approximately 17 tons.
Dividing 350 tons by 17 tons, we find that we need to form 20 TISE foundation piles.
Dividing the length of the foundation by the number of supports, we calculate that the distance between the pillars will be 1.50 meters. Thus, having decided on the step and number of supports, we can say that the calculation of the TISE foundation has been completed. Next we proceed to marking the foundation and arranging the castings.
This article will highlight all the problems associated with the use of foundations made using the TISE method. Will be discussed various disadvantages and the advantages that this technology has.
To begin with, it should be said that every person’s desire for their own housing is completely justified.
Everyone dreams of building their own house, and the most important thing is not even that in the end you have living space, it is much more important that you need to do it yourself and use the highest quality materials so that the newly built house will last for a long time.
But to realize such a dream, you need not only the means and desire to build a house, but also a clear construction technology that should be followed when building a house.
One of such technologies for the construction of walls and foundations is TISE. It was developed in distant Soviet times, by a builder with the last name Yakovlev. This technology developed successfully and with its help many people who had no experience or knowledge in construction built houses.
Now you need to figure out what method is used to build foundations, and what a TISE foundation is in general.
Advantages and disadvantages of TISE technology
First of all, it is necessary to say about the advantages of this technology, of which there are not so few.
- Very low cost of construction and construction of facilities, which is due to the fact that there is no need to use expensive technicians and equipment
- You can build in any conditions, and construction work completely autonomous, which allows you to work without connecting to electricity.
- The construction time of the object is minimal, and the same applies to labor costs.
- The main feature of this foundation is that it is used specifically for individual construction.
This means that any house can be built using it even without the slightest construction skills. There is no need to use equipment during construction; everything is done with your own hands.
- It is very convenient to connect various communications even on built objects.
But this method also has significant disadvantages that have a detrimental effect on the popularity of the widespread use of this method.
- Using this method it is simply impossible to build an object on a muddy or waterlogged surface.
More load will cause the piles to either break or simply sink, it all depends on the conditions in which they were applied.
- A huge amount of manual labor greatly complicates the process of drilling in rocky soils, which is why many problems arise with wells.
Yes, drills with a mechanical drive and motor are now being produced. But even they cannot always cope with hard soil.
- Placing a basement under the entire house is simply impossible due to the abundance of piles.
- There is a serious need to install blind areas of sufficiently large width.
All these pros and cons need to be taken into account.
If you weigh everything wisely, you can come to the conclusion that this technology is extremely technologically advanced and progressive, and most importantly, economical in order to occupy a large niche in individual construction.
Foundation calculation
You need to calculate the foundation based on the number of piles your home needs.
Load-bearing capacity of piles tise table
Below is the procedure to follow before laying the foundation
The load on the foundation should be calculated. Keep in mind that this indicator includes almost all the most varied weights, from the weight of the walls to the weight of the floors. After this, the result obtained is multiplied by 1.2 in order to take into account errors and wind loads. After this, the result is again multiplied by 1.3, this is the safety factor.
Next, you need to calculate how much load one pile can bear. To do this, you will need to go to the architectural section of the administration where you are building. They must find geological survey data related to this area, and after that they will not say what soils lie at the freezing depth (keep in mind that the depth of piles should always be lower than the freezing depth of soils).
The main thing is to ask them well, because in order to make a calculation you only need one formula.
After this, make a copy of the plan and divide the building load by the carrying capacity of one pile, this will give you the number of piles you need to properly support the weight of the house.
In addition, all piles must be indicated on the copy of the plan (in circles).
The procedure will be extremely simple. To begin with, you need to place the circles in the corners, along all the joints, and distribute the other circles evenly throughout the entire plan.
Thus, you will receive a plan of the pile field, according to which you will work further.
Pouring piles
The first thing you need to do is prepare the concrete.
After this, you need to place 4 pieces of reinforcement in the corners into the pre-drilled well, the most important thing you should know is that the length of the reinforcement should not be more than 200mm
Pouring concrete requires constant use of a vibrator.
If there is no vibrator, then you can work with a long stick, the main thing is that there are no delaminations of the concrete and no voids remain
The pile head must be concreted immediately to the mark so that formwork or plastic pipe can be applied
Concreting the grillage
Remember that you should not make a high grillage, it will serve as an additional load on the piles, which means you will waste extra material, which will increase the cost of construction. After all, the advantage of TISE is precisely that the final foundation is cheap and light.
The width should not be greater than the calculated thickness of your wall, because if you line the walls with brick, the width of the foundation can be easily increased.
Between the piles you need to place a sand bedding; it is on it that the formwork and grillage will be installed.
Concrete cannot be used less than M 300. In order for the concreting process to be continuous, a concrete mixer is required, but you can start the entire volume at once and without the help of it, but some skill is required in order to do this.
Conclusion
After reading this article, you probably understood what the pros and cons of using a TISE foundation are, and you also learned how to properly create a foundation for a new house.
Through the use of this technology, this process becomes very easy, precisely due to the large amount of manual labor and simple actions that need to be performed in the process of making the foundation.
 What is TISE? Advantages and disadvantages of technology
  Construction frame house do it yourself, stages
  Construction of a foundation made of FBS blocks
Piles TISE
TISE piles - how to train, strengthen, specify. How to avoid shrinkage and extrusion when cleaning soil and preventing side pressure TISA cup cutting.
These problems are solved by providing customers with a special shape that provides a foundation with greater reliability.
Let's think about the process of creating a TISA cup.
Once we have completed the full foundation sign, we can continue to form the pillars. This task is carried out in three stages: drilling a well at a certain depth, which creates tension at the bottom of the well, strengthening and drilling the pile.
The first two stages were discussed in the TISE section. Let's take a quick look at them and add important comments.
Drilling a hole under a piece of TISE
Drilling depth
Drilling the recess is carried out without an expansion blade. The depth is determined by the freezing depth and is set at the floor surface when forming, rather than at a “weighted average horizontal plane” for the entire area. This is especially important if the landscape is exposed to slopes.
Dry and dense floor
If the well site is dry and tight, drill several wells to a shallow depth, cover with water, and then drive through the rebar or knife.
Soothing and softening the soil will make drilling much easier. To reduce the forces applied, you can also increase the drill's leverage only within a reasonable amount, so do not turn the rods.
Stone floor
Drilling in rocky areas can cause additional problems. Fraction up to 5 cm. The TISE drill bit is easily inserted into the floor container. Larger stones must be further weakened, removed with bushes or rebar and, for example, obtained by a helicopter.
If a boulder meets the drill path, it should be well positioned and next to it, without changing the overall foundation layout, turn a new one.
Soil distribution
With dry granular soil, such as sand, the developer may encounter another type of problem - dusting wells or pouring a sand sample into a depression.
Cornerstone of TISE technology
This will cause problems when concreting the pile, but these can also be easily solved. In the hole, just add a little water, moisten the soil and “keep its shape.”
groundwater
Groundwater and flood waters are felt in the spring, when their levels increase noticeably.
If you work in such conditions, it may cause the semicircular extension to fail. To avoid this problem, each well should be filled with concrete after formation. The difficulty can also be avoided if the foundation is laid in the summer or autumn, when the spy has left.
useful
Tree roots often occur when drilling along the drill path. And if using thread or fine root drilling, removing thick roots can cause some problems.
In this case, the developer will help the sewer system.
The tool is made of high strength St65G, which can cut and remove very thick roots. In addition, it can be used as an ice ax in winter.
Formatting an extension
The formation of a hemispherical expansion in the lower part of the recess is carried out on the plug plunger, placed in one of two positions to form a diameter of 50 or 60 cm.
The soils that are cut off at the edge of the plow fall into a container in the soil, and sometimes when it accumulates, it is squeezed out with the cut.
A stretch can be created by rotating the creature clockwise. Only one should try not to use vertical pressure on the handles to avoid drill penetration.
You can rotate the drill in the opposite direction.
It won't get buried and the soil will disintegrate and accumulate under the soil container and lift it up. This will complicate the work, since the fork will remain on the upper hemisphere. In this case, it is necessary to periodically select the accumulated soil for the drill.
For example, when there are problems forming heel support for a TISE pilot, they work for a complex reason, the drilling may describe the path of a tapered rod.
This makes the job easier and the expansion smoother.
 |
An extension can be created in two steps. First, we create a smaller diameter extension, then place the plug in the next position and expand the hemisphere to the final size.
On very hard floors there may be a situation where this needs to be done without the need for an additional tool in the form of a blade with an inclined end to cut the soil in the area of the hole extension.
So you can use it straight or hoe. It is not possible to achieve tension at this full diameter tip because the load capacity of the column on such soil is quite high.
Strengthening the TISA Cup
Reinforcement is required to prevent the enlarged portion of the column from being torn apart by the protruding soil, and the shear portion of the pressure forces must also be eliminated.
 |
The corresponding fittings for these purposes are 10-12 mm.
You can use two rods bent into clips or four separate rods connected together at the top of the wire. The valves may or may not operate over the top edge of the support, but if the slope section is more than 10%, the valve body should preferably operate on a 20-25cm strip to prevent them from moving during soil conversion.
For reinforcement, you can use metal strips, corners, rods.
Therefore, it is advisable to use a pipe, since in the event that high groundwater levels may enter the pipe cavity and prolonged freezing, create stress that may lead to the collapse of the column. I immediately remember that the reinforcement should be placed no closer than 4 cm from the edges,
Concrete pavers
Some leaking problems with concrete fountains can only occur when high level groundwater.
If for some reason the newly formed well was not filled with concrete and brought water, then the pump pump pump or manual fall. A tube with a diameter greater than 100 mm can also be used. Lower it to the bottom of the hole and fill the concrete through the top hole, which gradually replaces the water.
If everything goes well with the groundwater level, betting on the hoof will not cause any difficulties for the developer.
Firstly, the prepared reinforcement is installed in the well, and the semicircular extension is filled with concrete.
 |
Advice!. Before concreting, you should not create sandblasting pads at the bottom of the well.
Firstly, the bulk density of the sand will be uneven and low, and a significant part of the cement concrete from the concrete will be included in the irrigation. This will reduce the load capacity of the stack and reduce the power and freeze resistance of the bottom.
A cylindrical sleeve is formed from waterproofing material - quartz felt, quartz felt, glass - and inserted into the recess. The top edge of the sleeve should be measured above the floor level by ~15 cm and the same for each hole, regardless of the slope of the site.
The cavity is filled with concrete, with the upper edge of the sleeve. To ensure that the protruding part of the floor is not sprayed against the pressure of the concrete, it can be covered with soil, compressed. This will help maintain the shape of the waterproof sleeve.
 |
Note to the builder
It is known that when filling a well, layers of air are formed in concrete that must be removed. If this is not done, water may soak into them and cause additional freezing stress, resulting in devastating consequences for the TISA pile. Therefore, the concrete must be compressed.
To do this, partially asleep, he forms each part of the rod with medicine, thereby extinguishing air bubbles. You can use a vibrating packer for this purpose.
A few days after filling the upper part of the wells, treated with compaction piles, and passing through the final stage of forming the base of the supporting belt - the abrasive base of the belt device.
M100 | B7.5 M150 | B10 M150 | B12.5 M200 | B15 M250 | B20 M300 | B22.5 M350 | B25 M350 | B26.5 M400 | B30 M450 | B35 M550 | B40 M600 | B45 Select the brand (class) of concrete you want to obtain. M100 (V7.5) Due to its low strength, it is mainly used for preparatory concrete work. Can be used as a “pillow” under a foundation, curb, paving slabs, road surface, etc. M150 (V12.5) Concrete of this brand has sufficient strength for pouring various types of foundations for small structures. Also used for pouring floor screeds and laying concrete paths. M200 (B15) One of the most popular brands of concrete (along with M300) used in suburban construction. Main application: pouring foundations (pillar-grillage, strip, slab), making concrete paths, walls, stairs. M250 (B20) Used for pouring foundations, light-loaded floor slabs, making stairs, retaining walls. M300 (V22.5) Along with M200, it is very popular in private construction. Due to its versatility, this brand of concrete allows it to be used for pouring the foundation for almost any house in the countryside, as well as for making fence strips and floor slabs. M350 (B25) Main application: production of floor slabs, load-bearing walls, columns, reinforced concrete products and structures, casting of monolithic foundations. M400 (B30) Rarely used in suburban construction. It is used for the manufacture of transverse beams, retaining walls, bridge structures and hydraulic structures, pouring pool bowls, and basement floors of monolithic buildings. M450(B35) Main applications: bank vaults, bridge structures, metro construction, hydraulic structures. M550 (B40) Main application: reinforced concrete structures special purpose(storage facilities of banks, dams, dams, metro construction). M600 (B45) Main application: foundations for complex and large-scale objects, bridge supports, hydraulic structures, special-purpose objects (bunkers, etc.). http://www.site
l When using a concrete mixer, indicate its volume. The calculator will calculate the number of batches for the required volume of concrete and the number of mixture components (cement, sand, crushed stone and water) for one batch. If you use any vertical loading container for mixing (bucket, trough, etc.), then indicate the volume of this container in liters. The calculation results can be seen below in this calculator “Calculation for 1 batch of a concrete mixer: Calculated values for the coefficient. yield of concrete mixture."
1.1-1.8mm | fine sand 2-2.5mm | average sand more than 2.5 | coarse sand