How to make a beautiful rocket for Cosmonautics Day. Space craft - the best ideas, simple crafts and tips for choosing decorations (80 photos and videos)
April 12 marks a significant holiday - World Aviation and Cosmonautics Day. In all educational institutions They conduct all kinds of educational events on this topic with children, organize exhibitions and competitions, and give them the opportunity to express themselves in creativity. On this day they remember the great feat of Yuri Gagarin and all Soviet people in television and radio programs, at theme nights and holidays.
In this master class I will show you how to make crafts for Cosmonautics Day with step by step photos with your own hands - an astronaut, a satellite, a solar system, a rocket, etc.
An astronaut, a conqueror of space outside of planet Earth, is a dangerous profession, however, all the children of the world dream of becoming such brave heroes. To achieve your goal, you should work long and hard, train, harden and study.
Astronaut is the most desired profession for boys who want to conquer the Universe. And they watch space flights, discoveries in infinite space, and the adventures of great people with special trepidation.
How to make crafts for Cosmonautics Day
Plasticine astronaut
For Cosmonautics Day we will prepare a wonderful one - this is an astronaut. His figure is sculpted using a fairly simple method. The main thing is to show the spacesuit, the special uniform.
In April, you can make a similar object in preparation for a significant event.

What you will need to sculpt this space craft:
- white and blue (or gray) plasticine;
- tool.
How to make an astronaut figurine step by step
It is necessary to show, first of all, the human figure. To make a real spacesuit in which a person can for a long time to be in space, to breathe and to be protected from radiation, you should choose white plasticine and add blue inserts.

Make several white parts from soft plasticine. The body should be elongated, the head should be rounded, but slightly flattened. Sleeves and clothing on the legs can be stacked, consisting of individual balls. Make several small balls for further sculpting of the four limbs.

Fasten the head and torso. The helmet can be immediately flattened to the front white ball stick on a round windshield in blue or gray. Gradually the appearance of the astronaut begins to emerge.

Glue additional parts onto the body and fasten the belts. This can be done by sticking a gray plate with several dots in front, and also by crossing the fasteners on the chest.

Now continue the assembly by adding legs and arms. Make legs from three or four white balls prepared earlier. If the plasticine has already hardened, cooled down, and does not stick well, then you can put toothpicks inside.
Make the lowest parts blue or gray. Of course, shoes are of no use in flight, but it is still customary to depict something like them on your feet.

Using a similar method, glue the hands, adding blue gloves to the bottom. The astronaut's spacesuit must be completely sealed, insulated from environment, or rather, from its absence, because there is no atmosphere in space.

But a person definitely needs to breathe oxygen. To do this, you should build a tube and oxygen cylinders. To do this, make a thin thread from blue plasticine, as well as a blue block. Glue one end of the tube in front to the helmet glass.

Glue the oxygen bag from behind to the back and the other end of the tube there.

Now the astronaut is ready to go far to the Moon or even further to Mars or Venus - to conquer the endless spaces of the Universe.


DIY crafts for Cosmonautics Day in kindergarten— video lessons
Craft SPACE for kindergarten
Plasticine application for Cosmonautics Day “Flight to the Moon”
Have you ever tried to draw with plasticine, and not just draw by smearing different shades of soft mass on paper, but create real pictures from thin flagella? You have the opportunity to try this interesting method of creativity if you are reading this article. In this lesson we will talk about unusual crafts for Cosmonautics Day, which the whole country celebrates on April 12.

The proposed craft is relevant because it is an applique or postcard that can be called “Flight to the Moon.” Shown here is a fragment of outer space, a high-speed rocket that is approaching the surface of the Moon. The main background is created in the form of flagella, now let’s look at how exactly.
To create a space application, prepare:
- plasticine of different blue and purple shades to create a general background;
- yellow, orange, white plasticine for creating cosmic bodies and particles of the Moon;
- white and gray plasticine for the rocket;
- cardboard of any color;
- body from an old pen.
How to make an application for Cosmonautics Day with your own hands
First, prepare cardboard and blue and purple plasticine. There is quite a long, albeit painstaking, work ahead to create flagella. It is better to use soft types of material.

Tear small portions from the prepared dark pieces, knead them in your hands, and roll out thin sausages. These sausages can come in different thicknesses and sizes. Also use different shades of plasticine and even mix the pieces you have available. Need to do sufficient quantity material to cover the main part of the picture completely, without gaps.

Mix some yellow and orange plasticine. Glue the resulting cake into the bottom corner of the picture. Make an imitation cheese using the body of an old pen. This will be part of the Earth's satellite.

Start chaotically gluing the dark sausages. Do it casually, without emphasizing smooth and clear lines. First, stick a few sausages randomly to mark some boundaries for convenience.

Then gradually fill the entire free surface of the application. To be safe, you can press the picture down on top with your palm. Thus, you will get a believable outer space if you use plasticine of different shades.

Make a flat oval piece for the rocket body, as well as the gray legs. Orange and yellow colors of plasticine are needed for the escaping flame.

Glue the rocket with flames and portholes. Now she is rapidly flying towards the Moon or even further.

Stick on some sparkling stars that twinkle in endless space to complete your cosmic composition.

It turned out like this interesting craft with your own hands for Cosmonautics Day.

What child doesn’t dream of flying far beyond the Earth on a real rocket, becoming a conqueror of space, becoming famous and receiving the status of the strongest and bravest? To do this, you need to be an astronaut and train for a long time to get into sufficient physical shape.
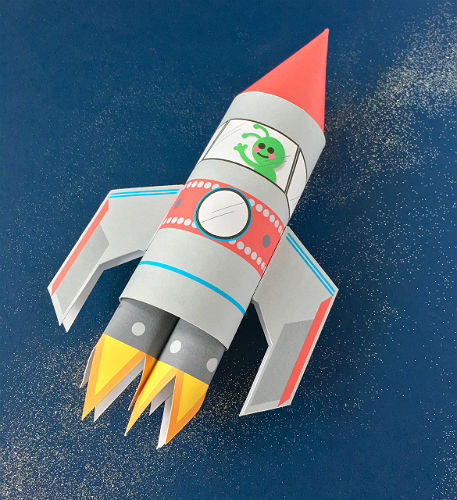
But no one will forbid us to dream, just as no one will forbid us to do interesting handicrafts. Together with your child, you can make an interesting origami rocket model out of paper - this is a craft option for Cosmonautics Day. Even the smallest children can master such a lesson.

Cut 2 identical squares from the sheet. Use one yourself, and give the second to your baby. Perform all movements slowly. You will see how easily your child will repeat all your movements and get his own model of a rocket.
And the reward for your efforts will be a porthole. You can attach a small photograph of the young designer to it. Thus, such a rocket can be considered as an unusual photo frame. The captain of the spaceship, of course, will be the child who tried so hard to make it.
To create a rocket using the origami technique you will need:
- bright paper;
- scissors;
- glue;
- children's small photograph;
- red cardboard;
- black marker.
How to make a craft rocket for Cosmonautics Day with your own hands
To work you will need a square. It is better to take a ready-made square sheet. If only rectangular sheets are available, then one corner can be folded, aligning the short side with the long adjacent side, then trim off the excess. In this case, you will get a fold along one diagonal, which will not be needed in the work, but it will not hurt.

Unfold the square and fold it in half lengthwise.

Unfold the paper and fold 2 sides of the square parallel to it and to each other to the highlighted strip. You will get some kind of shutters.

Unfold the paper and, turning the square so that the fold is vertical, close the 2 corners in the center, highlighting the shape of the house.

Now leaving the formed corner in its original position, again make bends along the previously marked lines. First, unscrew one side piece.

Then return the side to its original position, but not completely, but by bending it in the center. This will highlight one side of the rocket.

Carry out the same folding procedure on the opposite side. First, fold the side part.

Then return in the same direction, but making a bend in the center. Thus, the folded paper model will already look like a rocket with a high, sharp dome.

Turn the paper over. Using scissors, make small cuts in the lower part (where the rocket wings and body meet). Fold the corners and glue to highlight the wings.

Make a paper model.

In this master class, see how to make such a toy together with your son or daughter.

In order to launch it into the air, you will need a cocktail straw. Carefully insert it under the bottom of the rocket and blow. This will lift the rocket up some distance, the height of the lift will depend on the force of exhalation and the weight of the craft itself.

How to crochet a rocket for Cosmonautics Day
This rocket can be used as a bookmark or as an applique for children's clothing. See how to knit it here -.

Video tutorial - how to make a space moon craft
Read how to do it yourself and read here.
Space has been exciting human consciousness for many centuries, beckoning with its grandeur and mystery. Children admire the vastness and beauty of the unknown, so they often want to recreate outer space in crafts and drawings. To do this, we have prepared several master classes on crafts on the theme of space, which will definitely appeal to your child.
Materials for products
First, let's get acquainted with what you can make a “space” craft from.
- Plasticine;
- Polymer clay;
- Discs;
- Salt dough;
- Paper cardboard;
- Plastic bottle;
- Boxes;
- Textile.

These are not all the items that can be used to make crafts. The appearance, colors and list of materials are limitless, as is human imagination.

Rocket made from plastic bottles
Realistic space rocket can be created from ordinary plastic bottles of milk and other drinks. To do this, prepare:
- plastic bottles;
- ball pump;
- scotch;
- acrylic or gouache;
- cardboard;
- water.

Let's start creating an interesting space craft:
- Cut a cone out of cardboard that will serve as the top of the rocket. Cut out some space technology blades. Tape the resulting elements to the bottle.
- Decorate the rocket using gouache or acrylic paints. Draw the outer covering of the ship, a window, you can draw the astronauts in the window.
- Insert the pump needle into the plug of the product. If the hole does not match the needle size, add water before the rocket launches. Use the pump. Now your rocket can take off. Enjoy the show with your child!


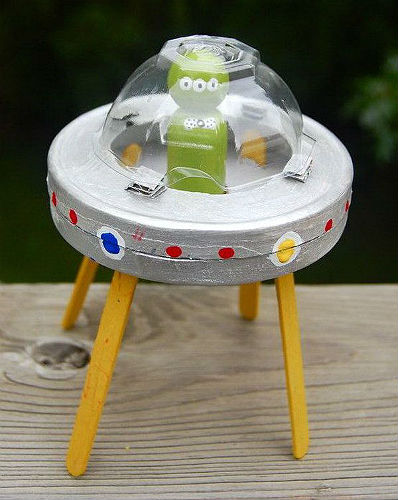
Flying saucer made from disposable saucers
To create a flying saucer, prepare several disposable saucers of different depths. Here are some tips for creating this easy craft:
- Turn the plate upside down, and glue another plastic plate of a different depth on top; You can cover the plate with foil, this will make it look even more unusual;
- Paint the plates with silver paint. On top you can draw various additional elements, such as stars, windows and aliens that live in the dish. You can make lanterns from buttons and rhinestones that are located around the perimeter of the plate.
- If desired, you can make a hole at the bottom of a deep plate (it will be the top of the transport for aliens), through which you can insert a thread. Next, tie the plate to the chandelier.


Plasticine planets
In order to create planets of the solar system from plasticine with your own hands, use the following instructions for creating crafts on the theme of space.

Here is a detailed algorithm for creating planets:
- Combine yellow, white and orange in one large plasticine ball. The ball must be one color and not contain streaks of extraneous colors.
- Glue the sun to the center of the dark blue sheet. You can first draw small stars and iridescent patterns on the sheet.
- Mix gray, brown and white colors in one small ball. Using a match or toothpick, make holes on the ball; they will serve as craters. The small ball will represent Mercury, which is the smallest planet in the solar system.
- Make Venus using brown, black and gray. One should be 2-3 times larger than Mercury. Use wire to draw the texture of the planet.
- Make our planet out of green, blue and white.
- Make Mars using orange, red and black colors.
- Jupiter should be made of beige, brown and orange. The planet is quite large, so do not skimp on material.
- Make a beautiful Saturn. Don't forget to make the famous planet ring.
- From blue and light blue make Uranus, which also has a ring.
- Roll a ball from blue plasticine to represent Neptune.
- White and gray roll into a small ball, symbolizing Pluto.


Once you've finished creating the planet, attach the planets to the orbit in the correct order. In order to become familiar with the correct order of the planets and original ideas for the background of the craft, we recommend that you familiarize yourself with photos of space crafts on the Internet

Simple space crafts for kids using tin cans
From ordinary tin cans, which can probably be found in every home, you can make interesting space inhabitants. Use your imagination to the fullest and don’t be afraid to experiment with appearance your alien.

First, prepare a tin can. Peel it off the label.

You can leave the original silver finish on the jar, but if you wish, you can paint the jar with acrylic paint, gouache or spray paint.


Draw a mouth, eyes and ears on the jar. Make a hole in the sides of the tin into which you can insert straws or folded pieces of foil to form handles.

The top of the alien's head can be covered with metal wool, and bright straws can be placed on top. The result will definitely amuse you and your child.

Instead of painted parts of the face, you can use bolts of different sizes as eyes.

Conclusion
There are a great many options for creating space crafts, differing from each other in material, color and style. Don't be afraid to experiment with these parameters, and in this case you will be able to create an original model of space objects.

Photo crafts space


Largely thanks to the recently launched Falcon Heavy rocket, interest in space discoveries and technologies has grown exponentially among both adults and children. The latter are already beginning to dream of becoming, if not an astronaut, then certainly a developer of the latest aircraft. Well, the approaching day of astronautics gives an opportunity to try your hand at the simplest thing for now: making crafts on the theme of space with your own hands.
| Contents of the article: 1. 2. 3. 4. |
DIY rocket
It’s no wonder that the rocket is the most popular craft from the space series.
The easiest way to do this is aircraft from plastic bottle. For this you will need:
- plastic bottle;
- primer (you can use PVA glue as it);
- acrylic paints;
- colored paper;
- foil;
- cardboard.
Prime the bottle and let dry. Cover with a layer acrylic paint, let dry and cover with another layer. Attach cardboard wings. Decorate the rocket with stars cut out of paper or foil.


You can simplify the task by avoiding staining and simply cover the bottle with paper or foil.


This impressive rocket can be made using tin bottles from Coca-Cola or other drinks:

It’s even easier to use a cardboard paper towel tube or toilet paper. It is enough to attach wings and a nose cone made from cardboard to it, decorate it with colored paper or decorate it with felt-tip pens.


To create an imitation of a flying rocket, you can also make sure that “fire” comes from the engines.


A hero-astronaut can fly in a rocket - just place an astronaut figurine inside or stick a photo of the child himself. Look how cheerfully he looks out of the porthole!


And you can make a real rocket that will definitely fly by watching this video and doing everything according to the instructions in it - of course, only with the help and under the supervision of your parents!
DIY UFO
Another popular space-themed craft is a flying saucer with aliens inside.
Make it as easy as shelling pears by using plastic or paper disposable plates. You can use a transparent plastic cup as a cabin. For a special effect it is good to plant in the cabin alien creature) made with your own hands or an ordinary toy). The UFO can be decorated and decorated with bright rhinestones and sequins.


You can attach ice cream stick legs to the plate.
You can even make a UFO out of wool if you master the skills of this needlework:

Unnecessary CDs and Kinder egg cartons can also be used to make flying saucers.

Models of the Universe
All kinds of models of the Universe or Solar System made from plasticine, papier-mâché, tennis balls, and felt look great.

They are often made in the form of a mobile that can be mounted under the ceiling, creating the illusion of objects moving in space.

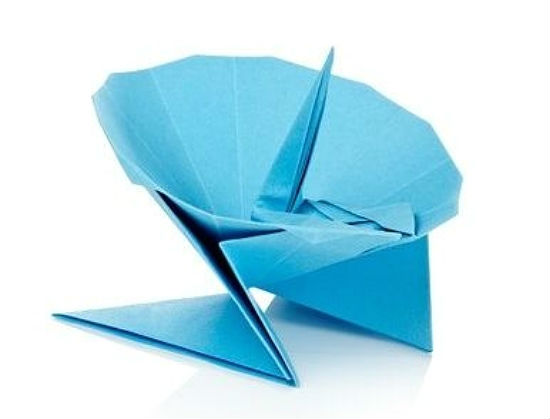
Crafts on the theme of space from origami
To create an original Star Wars starship, flying saucer, rocket or fighter, all you need is one sheet of paper. This can be done using the art of origami.


Watch the video on how to make a fighter using origami technique:
And here is a master class on making a starship:
And finally, a video through which you will learn how to make simple origami rockets:
Separately, it is worth noting volumetric (modular) origami, which allows you to create real works of art from individual paper modules:

What craft did you make? Share with us in the comments!
Cosmonautics Day is a holiday that gives educators great opportunity Reveal the secrets of the Universe for children. This is an endless layer of cognitive information that conceals everything that is so interesting to children: a mystery, a fairy tale, a fantasy without boundaries. Crafts for Cosmonautics Day, presented in our section, are an opportunity to bring the endless world of space closer, to literally touch the mysteries of the universe with your hands.
We create the Universe with our own hands
Contained in sections:Includes sections:
By groups:
Showing publications 1-10 of 688.
All sections | Space. Crafts for Cosmonautics Day
Target: The exhibition is held for the purpose of organizing joint activities children and parents, development of creative and aesthetic taste. Tasks: involving parents in joint activities with children, expanding children’s understanding of Space, stories USSR cosmonautics. In before...
 Target: clarify and expand children’s understanding of space Problems
: Educational: improve children’s ability to work with paper using the quilling technique; learn to navigate on a plane, act according to verbal instructions; expand children's vocabulary. Developmental: develop...
Target: clarify and expand children’s understanding of space Problems
: Educational: improve children’s ability to work with paper using the quilling technique; learn to navigate on a plane, act according to verbal instructions; expand children's vocabulary. Developmental: develop...
Space. Crafts for Cosmonautics Day - Summary of the lesson on applied creativity “Crafts from paper “Rocket”
Publication “Summary of a lesson on applied creativity “Paper crafts...” MDOU kindergarten No. 19 Summary of the organized educational activities Educational area"Artistic and aesthetic development" Visual activities Applied arts: paper crafts “Rocket” preparatory group for school Teacher Zakharova Olga...
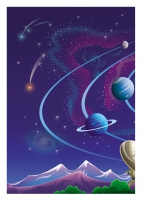 Image library "MAAM-pictures"
 All kids love something unusual. My child and I prepared a craft for the kindergarten of school 285-7 for Cosmonautics Day. Age 4 years. counting rhyme: There lived an astrologer on the Moon, He counted the planets: Mercury - one, Venus -2, Three - Earth, Four - Mars, Five - Jupiter, Six - Saturn,...
 Group educational – creative project"Space" for children middle group. Type of project: By dominant activity – cognitive and creative; By the number of participants – group; By the nature of contacts - among children of the same group; In terms of timing - short-term Problem: How...
 TECHNOLOGICAL MAP Explanatory note Group: second junior group of ODOD No. 576 "Ice" Educator: Smirnova Ekaterina Evgenievna Plan for joint activities in the format of the Federal State Educational Standard for Education (Lesson on artistic and aesthetic development (application) with activation...
Space. Crafts for Cosmonautics Day - Master class “New Year’s craft “Mouse on the Moon”
 Before you and I noticed, the long-awaited sorceress winter came again, the first snow fell and very soon the best, brightest and happy holiday both for adults and children - fabulous, magical New Year! Adults and children are looking forward to it, doing...
 Space has always attracted people. Every time we look at the night sky, we think about something different. But at least once in our lives, each of us was struck by the thought of how large and infinite our Universe is. The Universe is an infinite space that includes everything that is possible...
Summary of a lesson on the “Rocket” application for children of different age groups Municipal budget preschool educational institution“Kindergarten of a general developmental type with priority implementation of activities in the physical direction of children’s development No. 14 “Buratino” in Mednogorsk” Lesson notes on productive activity for children...
 Objectives: 1. Clarify and expand children’s ideas about space, planets, the Solar system, Cosmonautics Day. Arouse educational interest in space. 2. Develop imagination, imagination, the desire to convey your impressions, the ability to independently use drawing skills in...
The embodiment of the space theme opens up a huge selection of topics for teachers: the history of space exploration, the first artificial satellite of the Earth, the flight of Yuri Gagarin, the mystery of our natural satellite the Moon, the Universe with many other worlds, the existence of alien civilizations. Any of these themes has already been embodied in the works of preschoolers.
Teachers use all known materials and techniques. Having studied unconventional methods of drawing, children create whimsical pictures of other worlds. Young researchers are taking their first steps in designing and prototyping rockets and space stations. Using the appliqué technique, preschoolers create bright panels depicting solar system with many space objects. And of course, kids love making sculptures spacecraft, aliens, robots. These crafts are made by children using the methods of plasticine printing, modeling from salt dough, and constructing from all kinds of waste materials.
Before giving little fingers something to do, teachers activate the inquisitive minds of preschoolers. There is no more favorable topic for the development of abstract imagination than space. Having become acquainted with the already implemented ideas for crafts for Cosmonautics Day on the pages of our section, you will have many of your own thoughts and ideas. Discover the secrets of space together with your students!
Hello, dear readers and guests of the site!😍
Such a distant and endlessly attractive, charming space! Not every adult understands the fullness of this concept, let alone children. Every boy dreams of going to space, and girls won’t refuse either. Therefore, there are now a lot of planetariums and exhibitions on this topic. Schools and kindergartens are not lagging behind and for Cosmonautics Day they are organizing an exhibition of the works of their students.
In order not to search for ideas for a long time, we will make an amazing selection for you by April 12. We bring to your attention an extensive overview of delightful ideas for different ages. We make crafts and tell the children about Gagarin’s first pallet. Nothing brings children and parents closer together than spending time together and having fun.
In today's review you will find ideas for postcards on the theme of space, appliques, paper and cardboard work. All ideas were found on the Internet and we invite you to familiarize yourself with them.
Let's go!👨🚀👩🚀✨
Interesting crafts for Cosmonautics Day for kindergarten and school
We are starting a selection of amazing works made from plasticine. Creativity allows you to develop hand motor skills, thinking and imagination, and children simply need this. For creativity we will need:
- plasticine;
- cardboard;
Look how beautiful it is!

Children have amazing imagination, help your child develop through creativity. In the picture below, the sun is made of shiny packaging, the planets are made of plasticine, and the people are made of paper. This is how one application can combine several materials.

All works are individual and beautiful.

Plasticine applications are the easiest for kids to make.

Even a child can handle this application. We draw a rocket, planets, stars on cardboard. We show the child how to make small balls from plasticine and first decorate the picture together. Developing our fingers.

Let's move on to large-scale work that is suitable for a cone for kindergarten and school. For creativity we need:
- Box (suitable for shoes);
- Plasticine;
- colored paper or watercolor paints;
- Colored cardboard (dark blue or black);
Let's take a box and cover it with colored paper, or you can do it a little faster and just paint the box. Then we make a sun on colored cardboard in the corner. We make flagella from white plasticine and attach them to cardboard. Next we make planets and fix them on flagella. We make stars, rockets, people and aliens from plasticine. Glue the finished applique to the bottom of the box. We attach the figures to the wall of the box.

Another option for working in 3D. We also take a box as a basis, draw the sky and stars. We attach plasticine planets to strings.

The work process is the same, but the applications turn out completely different.

Continuing the theme of plasticine crafts, we invite you to draw or print a picture. And draw it with plasticine. See an example below.

The creative process is not only interesting, but also develops attentiveness and perseverance.

Space applications for preschool age.

DIY crafts for Cosmonautics Day
And so, we begin the simplest tasks that the child himself can handle. And the first option would be to make a craft from cardboard sleeves.
For work we need:
- cardboard (toilet) sleeve;
- glue;
- paints or colored paper.
The picture below shows the process of creating a rocket. As you can see, it’s not at all difficult to make.

There are more step by step photo how to create a spacecraft.
For creativity we will need:
- sleeve;
- colored paper;
- glue and scissors.

How do you like such bright rockets, here they are already decorated with colored paper. And we send the minion into space.

They make amazing space rockets in kindergarten. The guys flew to the moon.😉

Let's move on to the flying space saucer. It also relates to space and is interesting for children. We will make it from scrap materials.
For creativity we need:
- paper plate;
- plastic bottle;
- glue;
- markers or paints
Take two paper plates and glue them to each other. Then we will paint it on both sides with felt-tip pens or paints. If you don't draw very well, then it's better to outline or print the alien. Let's color it brightly. From a plastic bottle with a volume of 0.5, cut out a ring 5-6 centimeters high. We attach it to the plate using plasticine or glue, and insert the alien inside. This is the kind of original work we produce.

There is another version of the flying saucer. Making it is also not difficult. We take a paper plate, decorate it with paints, maybe even plasticine. Let's create an alien from plasticine. If there is a transparent candy jar, then it’s great that we need it. No, it doesn’t matter, we’ll make it from a plastic bottle. We put the alien inside and attach the jar to the plate.

Oh, there are still such aliens in space.

Space saucers can be made in different ways and from different materials. How do you like space crafts made from old disks and a plastic Kinder egg? Glue long skewers.

Friends, look what kind of flying saucers preschool children are making.

Let's move on slowly to complex versions of creativity. We found such a wonderful job on the Internet. Perfect for an exhibition.

We make a huge rocket with our own hands from a plastic bottle.
For work we will need:
- plastic bottles;
- colored paper;
- clear tape
We cut the bottles and fasten them together with tape. Then let's take colored paper and decorate the space rocket. So that our craft does not accidentally get wet, and the paper does not tear. Carefully wrap the top with tape.

The result is such a beautiful, bright rocket.

I would like to note another creative option such as felt work. Here, of course, you definitely can’t do without your mother. Soft and interesting rockets. Children's rooms are often decorated with such toys.

Applications and even teaching aids craftsmen make it from felt.

Felt is not a fancy material, it is a pleasure to work with it. If you cook, work in the kindergarten for junior groups, then felt will help you with this perfectly. Most often, applications are made using Velcro. So that children can touch, attach and detach parts.
 source: Yandex pictures
 But we won’t limit ourselves to felt. And let's crochet space!

How do you look at this option?

And they couldn’t show you such wonderful space toys. Do you think it will be good for the competition?😉😍

Cosmic ideas from the land of Masters
The following ideas that we will show you were found on the website of the country of Masters; the authors post photos of their crafts. Maybe you will find some interesting ideas for yourself. There are very few days left until April 12th.
Charming DIY paper lunar rover. What kind of endurance is needed to create such a masterpiece?
 Source Country of Masters:
  Source: Country of Masters: Author: desert
 Making the following craft is very easy. It is entirely made of plasticine. Benevolent Martians say hello Russian cosmonaut. Great!
 Source: Country of Masters: Author: Timofeevna
 Rockets for April 12th, a great craft for an exhibition or competition. Made using modeling and design techniques.
A Russian guy took off in a rocket,😎
I saw the whole earth from above.
Gagarin was the first in space... 👨🚀
What score will you be?😍
 Source: Country of Masters: Author: YULIA Ryadskaya
 There are an incredible amount of ideas. All the works are amazing, the guys’ creativity is in full swing and it’s wonderful!
 Source Country of Masters:
 - old disks;
- plasticine;
- half a plastic egg from a kinder surprise.
 Source: Country of Masters: Author: Pelargonium
 I really liked the idea with the planets. It turns out to be a whole benefit for children. To work you will need:
- colored cardboard;
- decorative glue;
- double-sided tape;
The craft is made using the paper tunnel technique. We prepare the basis for work. To do this, take blue cardboard and fold it like an accordion so that the lines are one centimeter wide. We will need two parts.

Then we prepare cards with planets. Take colored cardboard, cut out a circle of the same diameter for everyone, decorate it with sparkles, and attach stars. You can make the planets yourself from colored paper or cardboard. Oh, there is an easier option, just print it on a color printer.
 Source: Country of Masters: Author: Elena Oleynikova
 All that was left was to combine everything prepared into one whole. Let's take the base, namely, roll the part into an accordion, carefully glue the double-sided tape. Glue the sheets of planets onto tape.
 Source: Country of Masters: Author: Elena Oleynikova
 We'll do the same on the other side. Thus, the craft will be stable and the “tunnel” technique will be clearly visible.
 Source: Country of Masters: Author: Elena Oleynikova
  Source: Yandex pictures
 DIY ideas for crafts on the theme of space from waste materials
It is becoming more and more popular to make crafts from waste materials (at hand), in other words, what you have at home will definitely be useful for creativity. Oh, you also think so, that there is no need to throw things away?😉 We give a second life to the material at hand.
How do you like this comic rocket made from a plastic bottle and cardboard? We can say that the work was done using modeling techniques!
 Interesting idea from disposable tableware, plates and glasses.
 On the vastness of the world wide Internet, ours has such a cool job. People are good at making up inventions. And it’s so pleasing how creative our people are. Make plastic shampoo bottles and caps racing car to aliens.

Soap box lunar rover. This is what hands from that place mean.😉😍

Wow, you found a tinfoil space station.

The alien says hello to you! For creativity you will need:
- two disposable spoons;
- two deep disposable plates;
- one flat plate.
- plasticine;
- straw straws;
- foil
We wrap all the plates in foil and glue the parts to each other. We make aliens out of spoons and straws. Next we decorate with plasticine.

I also offer you such material as puff pastry. Do you have any favorite space heroes?

For children, such creativity will be interesting. Once the dough has hardened, allow your child to color the work themselves.

We create a voluminous space work with our own hands. Cut off the bottom of the bottle and cut out a window. We put the sock on the bottles and cut off the unnecessary part of the fabric. Carefully make a cutout and cover it with paper around it. Then we’ll finish the rocket, attach cardboard parts, and make clouds from cotton wool.

Paper crafts for Cosmonautics Day for children
How can there not be works in our selection made from such a simple material that is easy to handle and you can create whatever you want with it. Let's start with simple applications - children love them very much. There are ready-made ones in stores, but we are not looking for easy ways and will create them ourselves.
Astronaut template.

Ah, this is what happens in the end. I really like it, how about you?

The astronauts themselves, beauty! There are so many ideas that your eyes just run wild, you want to do everything at once. It's a shame that this is not possible.

April 12th is a holiday, but what do we always cook with you from paper? I think you already guessed that we're talking about about postcards. So let's see some ideas, maybe you'll like something for yourself.

In order to make a postcard we will need the following materials:
- colored cardboard;
- colored paper;
- templates;
We trace the templates of the month, stars, astronaut and rocket on colored cardboard and cut them out. Then we glue all the details onto the front side of the work.

There is one simple idea in performance.
